Mobile web browsing is all about finding what you need quickly and with as little hassle as possible — well, in theory, anyway. In the real world, the act of surfing sites from your smartphone is often anything but efficient.
From sites that have not-so-friendly mobile interfaces to browser commands that take far too many steps to execute, hopping around the World Wide Internuts from a handheld device can frequently leave something to be desired.
Fear not, though, my fellow finger-tappers: There are plenty of tricks you can learn to make your mobile web journey more pleasant and productive. Try these next-level tips for Google’s Chrome Android browser and get ready for a much better mobile browsing experience.
1. Switch tabs the simpler way
First things first: Got multiple tabs open? Move between ’em with minimal effort by sliding your finger horizontally across the address bar. You’ll be zapping between sites in seconds.
2. Manage tabs like a pro
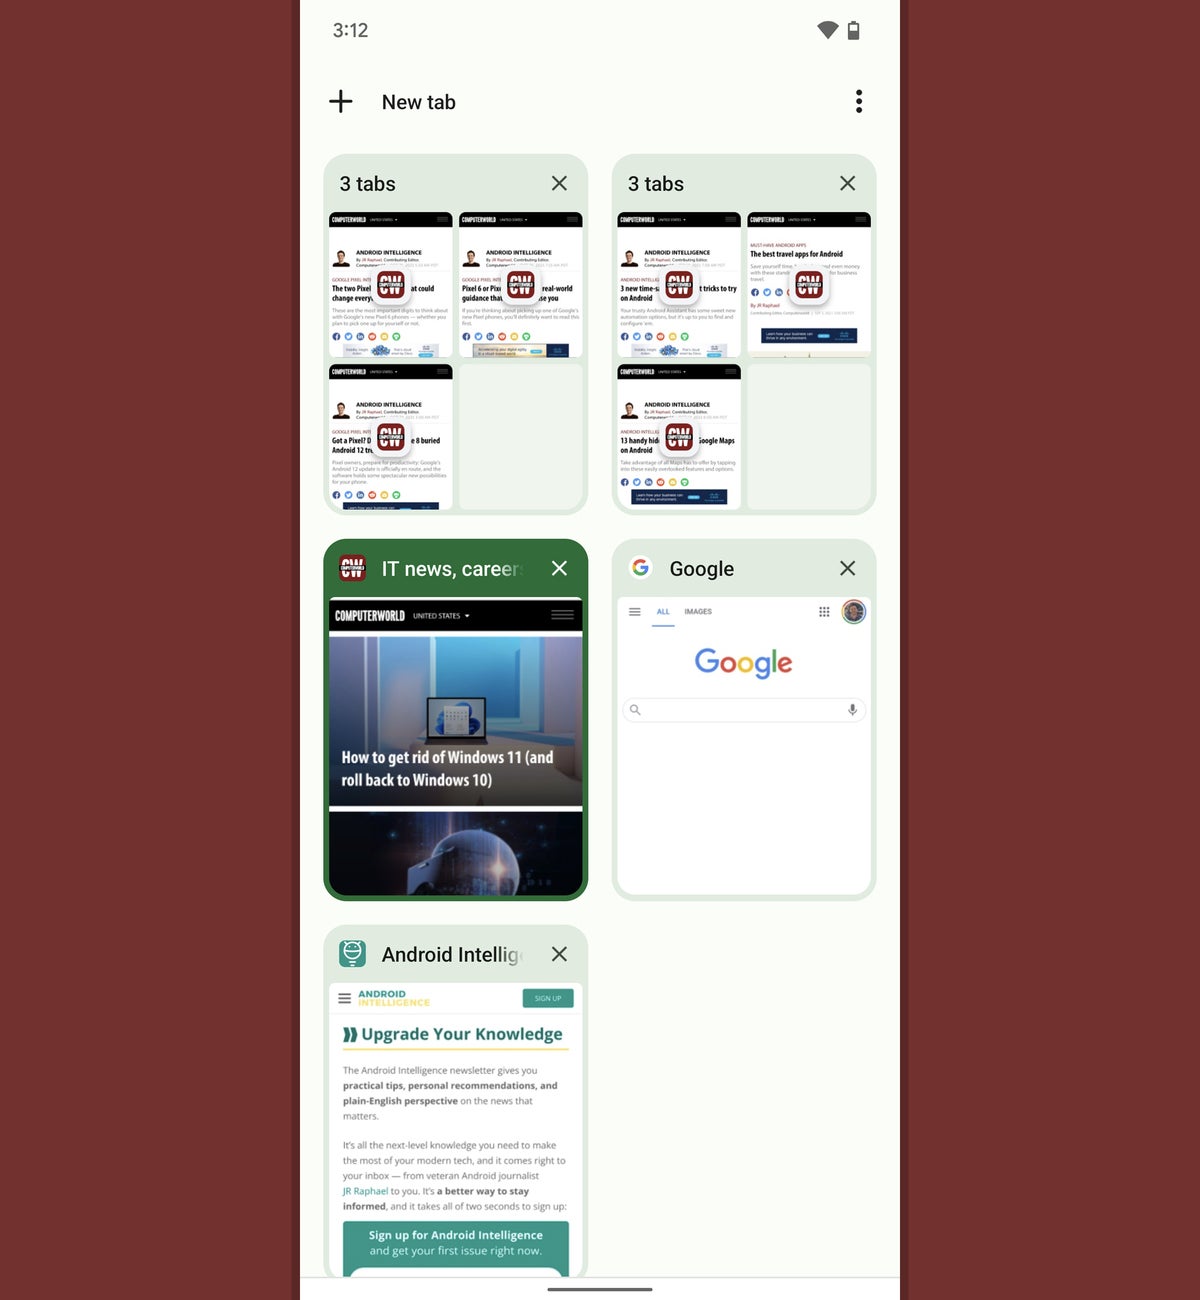
For more advanced tab management, swipe down on a tab, starting at the address bar. That’ll take you to Chrome’s tab overview interface, where you can see all of your open tabs as cards.
From there, tap on any tab to jump to it, swipe sideways on it to close it, or touch and hold it to drag it to a different place in the interface. You can even drag a tab on top of another tab to create a group and keep all of your open stuff organized.
 JR Raphael/IDG
Chrome’s tab overview interface — which seems to be in a constant state of flux — is the fastest way to view and manage tabs.
3. Close all of your tabs at once
When you have tons of tabs open and want to clean house quickly, tap the three-dot menu icon within that same tab overview interface — and whaddya know? There’s a handy hidden command there for closing all of your tabs in one fell swoop.
4. Copy a site’s URL in no time
Sure, you can copy a site’s address by opening the main Chrome menu, selecting “Share,” and then selecting “Copy to clipboard” from the list that appears — but sweet sassy molassey, that sure seems like a lot of steps.
Snag a URL with less work by tapping the address bar at the top of the screen and then hitting the copy icon (what looks like two overlapping rectangles) directly next to the page’s URL.
5. Share with a single step
Sharing a page is probably the command I use more than any other in Chrome on Android, whether I’m sending something to a friend or colleague, saving it into my notes for later reference, or emailing it to random strangers. (Hey, we all have our quirks.) And yet, that blasted sharing button is never as readily available as it oughta be.
Well, here’s the fix: With one quick adjustment to Chrome’s under-the-hood settings, you can enable a permanently present one-tap button for sharing a page from the browser to anywhere else on your phone. It’ll save you precious time, and there’s absolutely no downside.
As of this writing, you’ll need to dig a little deep to activate the associated setting:
- To start, type chrome:flags into Chrome’s address bar on your phone.
- Type button into the search box at the top of the screen that comes up.
- Find the item labeled “Adaptive button in top toolbar” and tap the “Default” box beneath it.
- Change that setting to “Enabled Always Share,” then tap the blue Relaunch button at the bottom of the screen.
Once Chrome restarts itself, you’ll see a spiffy new dedicated sharing button right at the top of the browser. Much easier, no?
6. Share a link to specific text within a web page
When it comes to website sharing, a link alone isn’t always enough. Sometimes, you want to point someone to a specific section of text within a page — and typically, there’s no great way to do that.
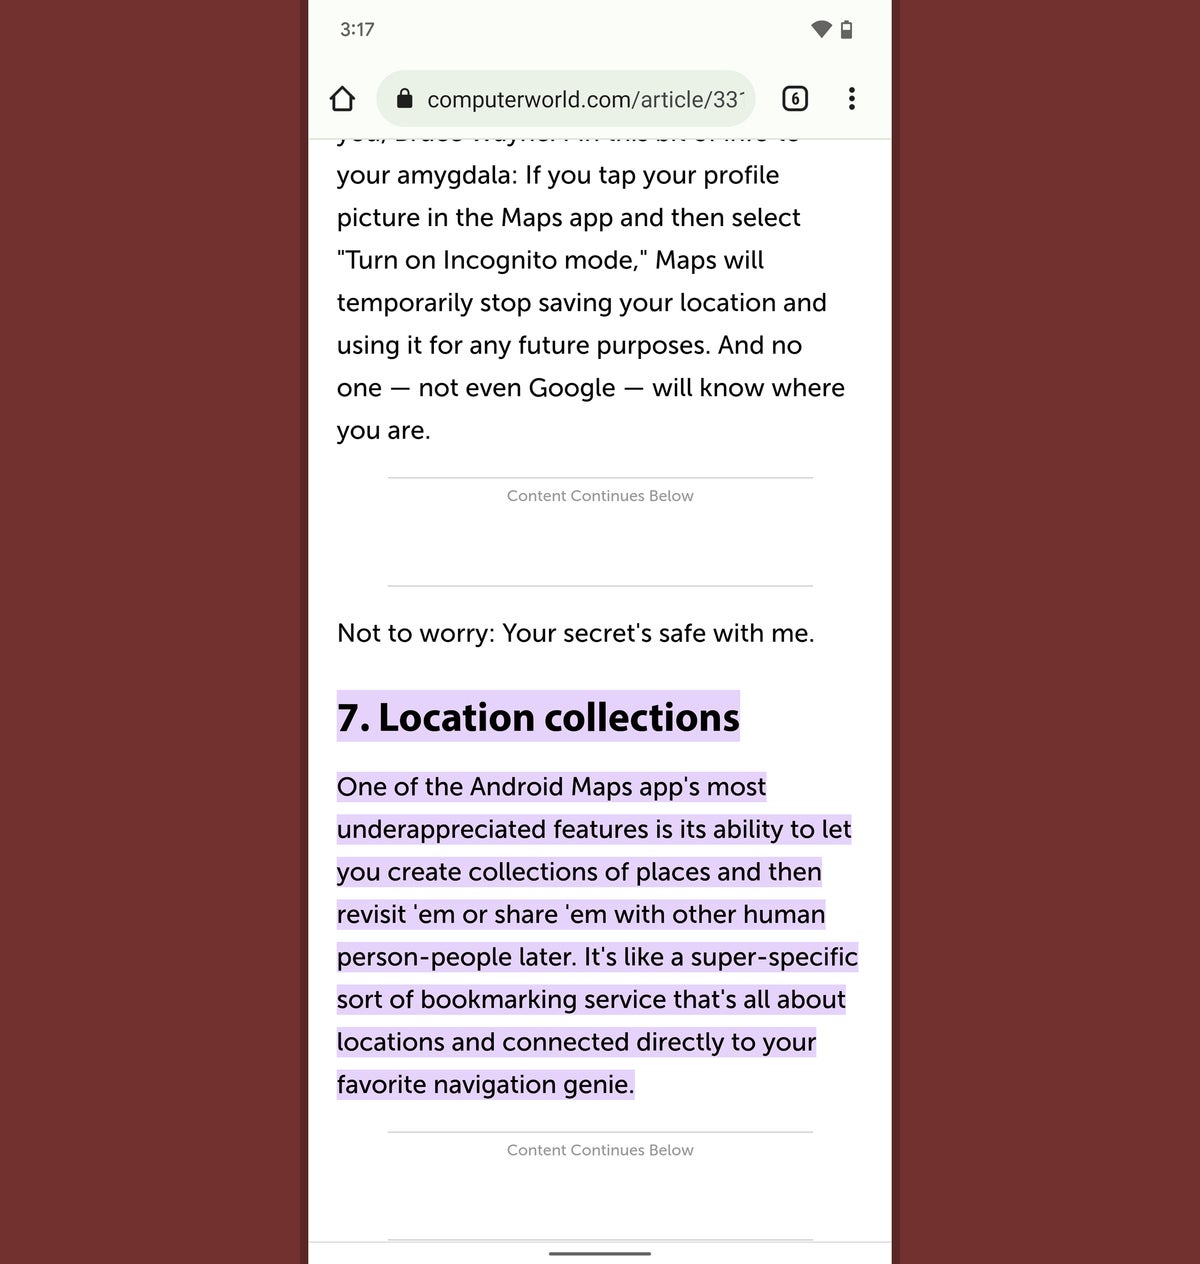
Or so you’d think. When such a need next arises, press and hold your finger to the text in question within the page in Chrome. Use the selectors to highlight the exact area of text you want, then tap “Share” in the menu right above the words.
Click the button to copy the link or use one of the other available sharing options to send it to another app, and the link will be specially structured so that the page will automatically scroll down to your selected text and highlight it as soon as it’s opened (provided it’s opened in either Chrome or Edge) — like this:
 JR Raphael/IDG
When you create a link to specific text within the Chrome Android app, the page will open to that exact area with your text highlighted.
Point made, seconds saved.
7. Send a link to one of your other devices
Forget sharing with other people for a minute: What about when you need to send a link to yourself — from your phone to a computer or maybe even another Android device?
The Chrome Android app has a handy option that’ll handle that for you. All you’ve gotta do is tap the share icon within the main Chrome menu (or at the top of your browser, if you followed our earlier tip!) and then select “Send to your devices” from the menu that shows up.
That’ll give you a list of available devices where you’re signed into Chrome, and once you select any of ’em, your current page will pop up on that device as a notification — no wires or self-emailing required.
Who knew?!
8. Edit and mark up screenshots with minimal effort
Sometimes, a picture can be worth a thousand words (or at least a couple hundred). If you feel the urge to capture and share a screenshot of something you’re viewing in Chrome, make a mental note: You can do it from right within the browser and rely on Chrome’s built-in tools for editing and annotating your screenshot without ever having to leave that environment.
Just hit that share command once again, and this time, look for the “Screenshot” option in the menu that appears at the bottom of the screen. Tap it, and you’ll find yourself in a fancy editor where you can crop, add in text, and draw all over your image as needed.
 JR Raphael/IDG
Chrome’s built-in screenshot editor makes it easy to capture, edit, and mark up screenshots (self-deprecating or otherwise) within the browser.
Once you’re finished, it’s just one more tap — of the “Next” command at the top of the screen — to either save your creation locally or share it to any other destination on your phone.
9. Save a page for offline viewing
The next time you’re about to head onto a flight, into a tunnel, or into a time machine that’s transporting you back to an era without Wi-Fi, plan ahead and save some articles for your offline reading enjoyment.
You’d probably never know it, but Chrome actually makes that easy to do: While viewing any web page, open the main Chrome menu — by pressing the three-dot icon in the app’s upper-right corner — and tap the downward-facing arrow icon at the top. And that’s it: Chrome will save the entire page offline for you. Whenever you want to find it, just open up that same menu and select “Downloads.”
All of your saved pages will be there and waiting, regardless of what place, year, or dimension you happen to be visiting.
10. Convert a page into a PDF
Maybe you want to make a more permanent and easily shareable offline copy of a web page. Hey, no problem: Just save it as a PDF.
Open Chrome’s main menu while viewing the page, then select “Share” followed by “Print.” Make sure the printer is set to “Save as PDF” — if you see some other printer name at the top of the screen, tap it to change it — and then tap the circular blue icon in the screen’s upper-right corner and hit the “Save” button on the next screen.
All you have to do next is open your phone’s Downloads app or your favorite Android file manager to find the document.
11. Act on text within a web page
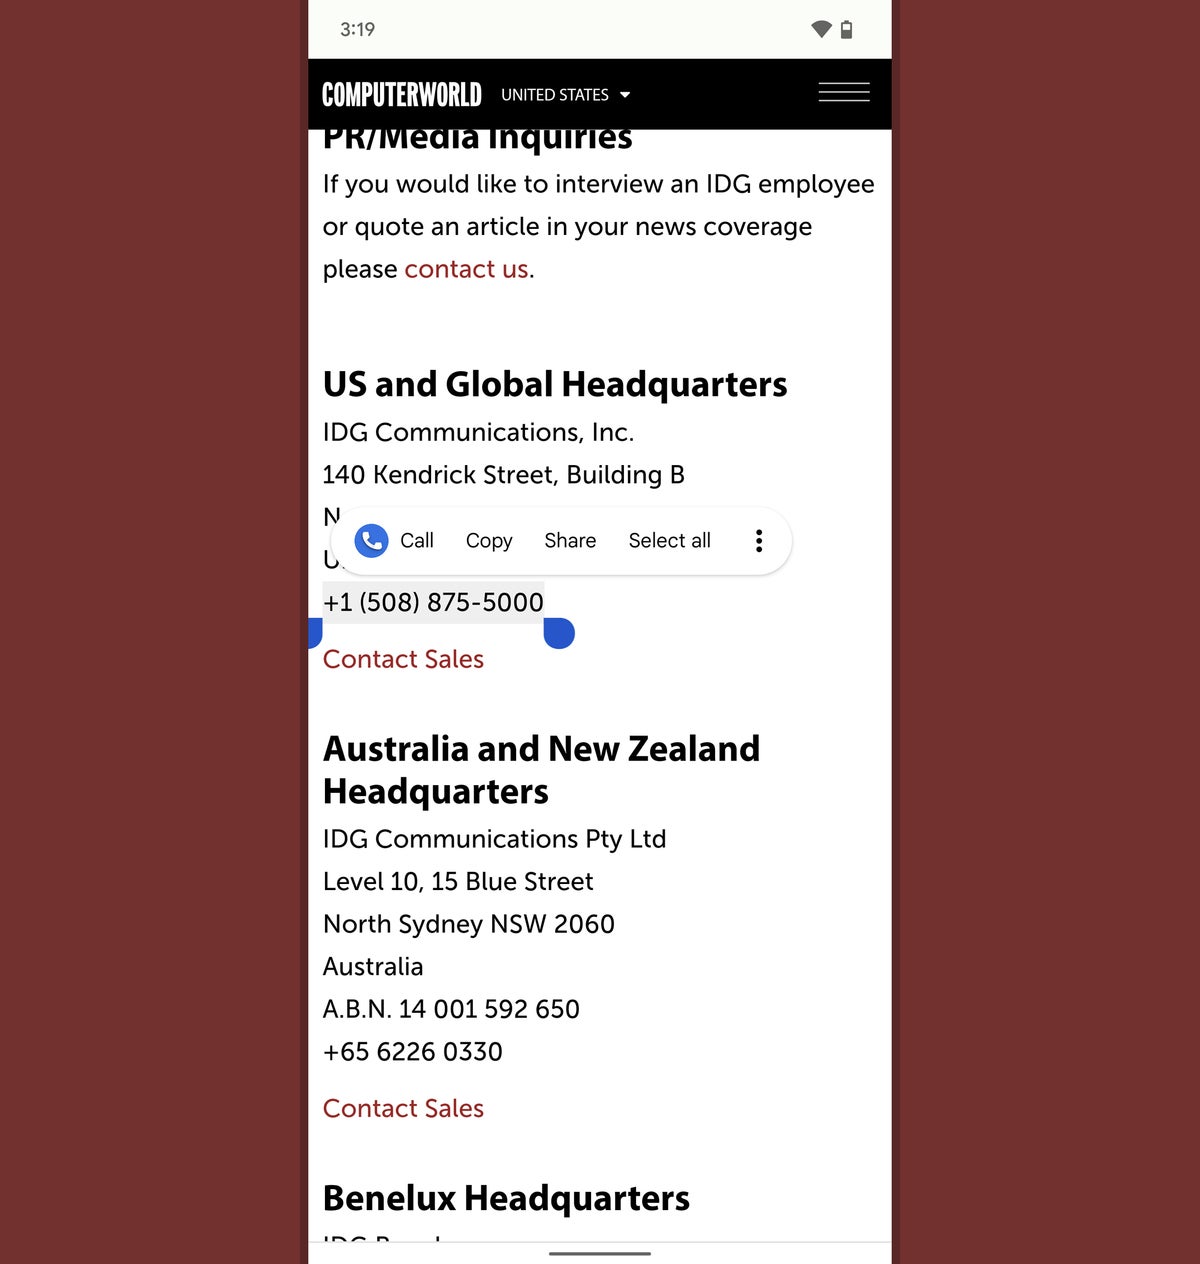
Why waste energy typing things into Chrome when you can just tap to find what you need? Anytime you see text on a web page that you want to act on, press and hold your finger on the words — then use the sliders that appear to adjust what’s selected.
Chrome will pop up a small menu with options to perform a web search on the phrase or to share it to any other app on your device (like a messaging service or note-taking app, for instance). If you’re using 2017’s Android 8.0 release or higher — and at this point, you’d better be! — the system should also automatically recognize and offer appropriate one-touch suggestions for things like phone numbers, physical addresses, and email addresses.
 JR Raphael/IDG
Tap some text to share it, search for it, or act on it in other context-appropriate ways.
12. Search without stopping
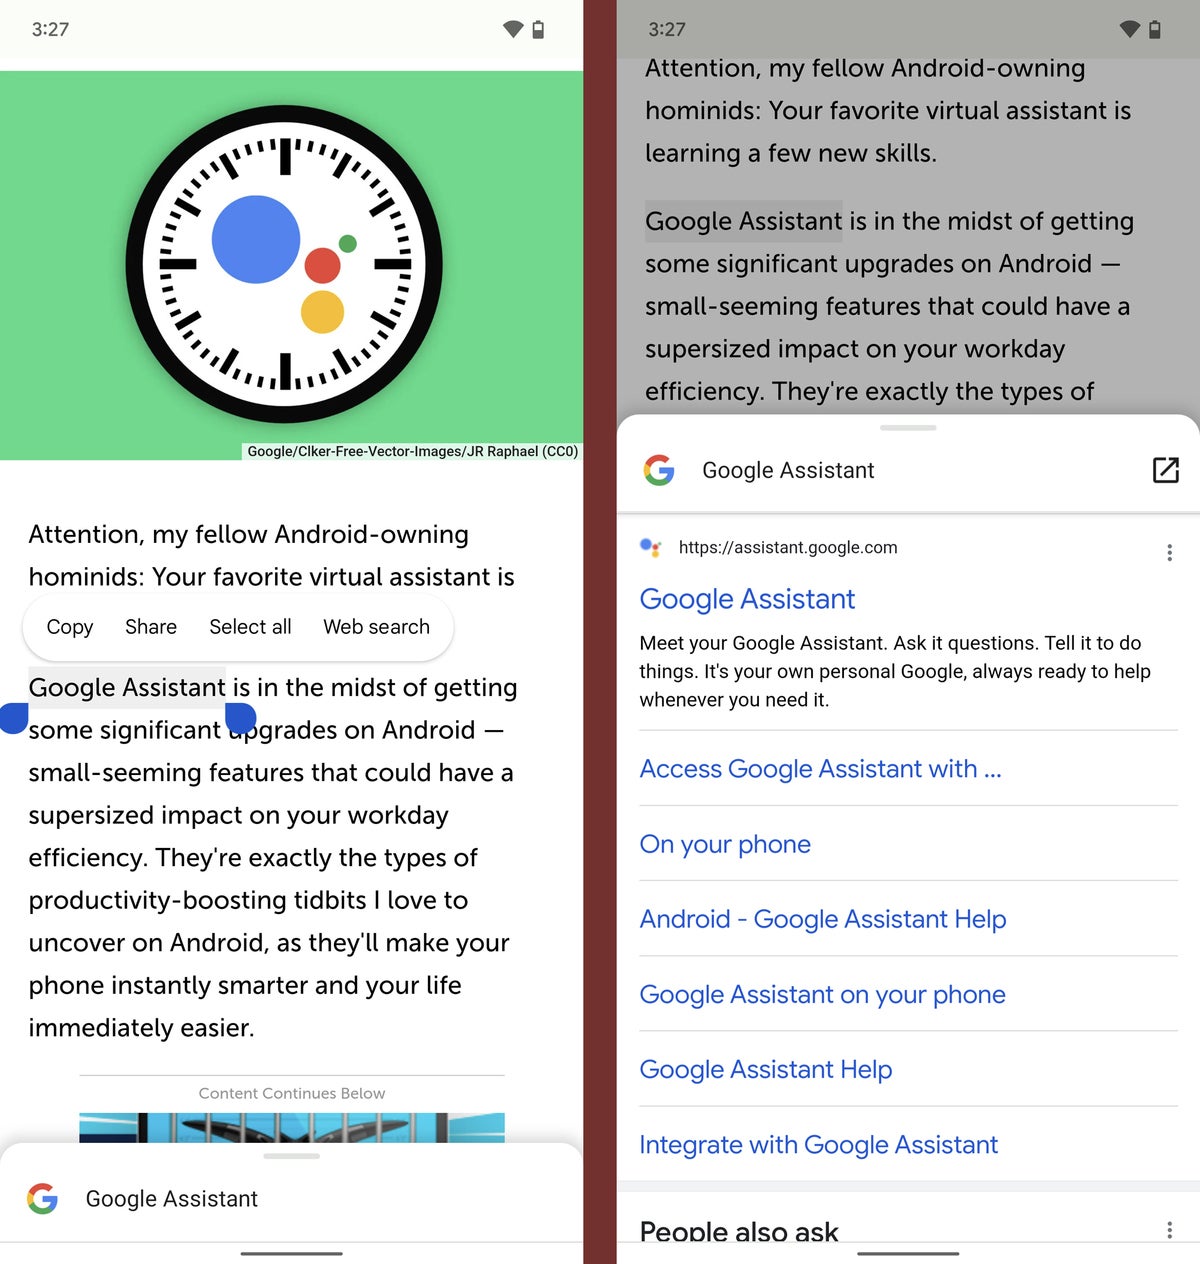
There’s an even simpler way to perform a web search when you only need a quick peek at the information: Highlight the phrase you want to look up, as described in the previous tip — and then look for the Google bar that appears at the bottom of your screen.
Either tap that bar or slide up on it, and you’ll be able to glance at the results for the term right on top of the page you’re already viewing. You can then tap on any result you see to open it in a new tab, tap the icon in the upper-right corner of the panel to open that as a new tab, or slide your finger down on the panel to close it altogether.
 JR Raphael/IDG
Chrome’s built-in quick search option is a convenient way to peek at results without interrupting your workflow.
13. Get answers right in Chrome’s address bar
Sometimes, you don’t even need to open a thing to get the information you require. The Chrome Android browser is able to serve up instant answers right within its address bar — so if, for instance, you want to know how old Mark Zuckerberg is (the correct answer is always “old enough to know better”) or how much $25 is in euros, just type the question directly into the box at the top of your browser. Chrome will give you the info right then and there, and you can go right back to whatever else you were doing without having to load another page.
14. Preview a link before you commit
I don’t know about you, but I tend to open up an awful lot of links while I’m looking around the web. And more often than not, I end up looking at the resulting pages for approximately 2.7 seconds before deciding to close ’em and move on.
The Chrome Android app has an incredibly useful command that saves me tons of time with that manner of browsing. Just open up any web page (heck, even this one!) and press and hold your finger on any link you see.
Select the “Preview page” option from the menu that appears, and there ya have it: You can see the linked page in an overlay panel, just like with the search results in our earlier tip. You can then tap the box-with-an-arrow icon in the panel’s upper-right corner to open it as its own tab and slide it downward (or tap the “x” in its title bar) to dismiss it entirely.
Convenient, wouldn’t ya say?
15. Find what you need faster
Chrome has a hidden way to scan a page for a particular term without much effort: Open the browser’s main menu, select “Find in page,” and type in the term you want. Hit the down arrow at the top of screen once — and then, instead of hitting that same arrow over and over to see every place the term appears, slide your finger down the vertical bar at the right side of the screen.
That’ll move you rapidly through the page, with every instance of your term highlighted for hassle-free viewing.
16. Zoom single-handedly
Pinch-to-zoom is, like, so 2013. When you’re using your phone with a single hand, as so many of us tend to do these days, Chrome has two far easier methods of magnifying a specific part of your screen.
First, on many devices, you can simply double-tap anywhere on a page to zoom into that area and have it take up the full width of your display. Double-tapping a second time will then zoom back out.
Second — and especially nifty — you can double-tap and leave your finger down, then drag downward to zoom in or upward to zoom out. It sounds a bit strange, but give it a try; it’ll get you where you need to go without all the awkward finger yoga that comes with one-handed pinching.
(Note that these advanced zooming methods won’t work on all web pages; generally, if a site is already optimized for mobile viewing, you’ll be limited to the regular ol’ pinching action. But more often than not, the need to zoom comes up when a site isn’t properly optimized — or when you’re deliberately viewing the desktop version of a site — and that’s when these techniques are typically available.)
17. Zoom where you wanna zoom
For some inexplicable reason, lots of websites prevent you from zooming in on your mobile device in any manner. And for a variety of reasons — whether you want to make the text larger or get a closer look at something that catches your eye — there are bound to be times when you want to move up close and personal.
Thankfully, Chrome lets you take back control. Head into the app’s settings, open the Accessibility section, and find the option labeled “Force enable zoom.”
Activate the checkbox alongside it and get ready to zoom to your heart’s content — whether the website you’re looking at wants you to or not.
18. Make the web easier to read
Let’s face it: Some websites don’t exactly make reading pleasant. Whether it’s an annoying layout or a font that hurts your cerebrum, we’ve all come across a page that could be a little easier on the eyes. (Uh, no need to name any specifics, OK?)
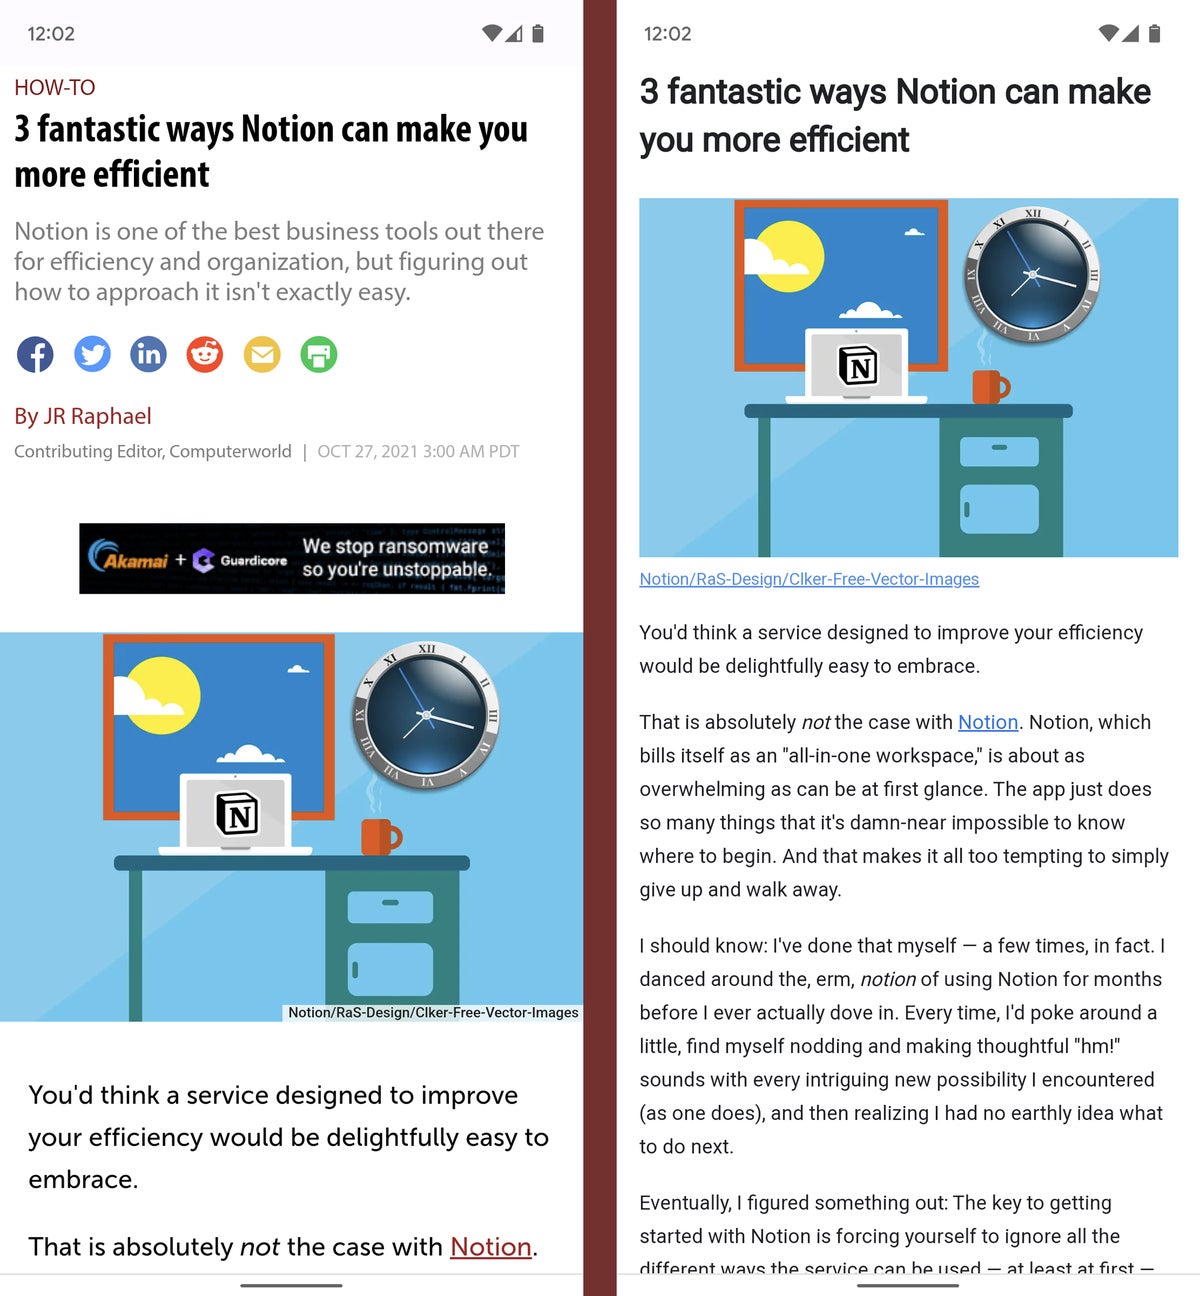
Google has a solution: Chrome’s simplified view mode, which makes any website a bit more mobile-friendly by simplifying the formatting and stripping out extraneous elements such as ads, navigation bars, and boxes with related content.
Look in that aforementioned Accessibility section of Chrome’s settings and make sure the box next to “Simplified view for web pages” is activated. Then, whenever you’re opening an article, watch for a white bar at the bottom of your browser with the words “Show simplified view.” Tap it — and the text will transform right in front of your tired eyes.
 JR Raphael/IDG
Before and after: Chrome’s simplified view.
Need easier reading yet? Go back to that Accessibility section of Chrome’s settings and play with the “Text scaling” slider at the top of the page. It’ll make all the text you encounter across the web larger, independent of your system-level text size setting.
19. Silence a site in no time
Sites that automatically play videos you didn’t ask for are bad enough (insert awkward eye darting here), but sites that include audio in their autoplay videos are absolutely inexcusable.
You’d never know it, but Chrome has a super-fast way to get any site to shut up when it’s barking at you at the wrong time. Just tap the little padlock icon next to the site’s URL in the Chrome Android address bar, and you’ll see a secret on-demand control panel for adjusting all sorts of useful site-specific settings.
 JR Raphael/IDG
One tap in Chrome’s address bar, and you can silence any site that’s playing audio in no time.
If the site is making sound, the “Sound allowed” permission will be there and waiting. And all you’ll have to do is tap it to reveal a toggle that’ll let you muffle that misbehaving web-kitten once and for all without having to dig deep into any out-of-the-way menus.
20. Refresh with a flick
Need to reload a page? Swipe downward from anywhere in the main browser area. (You’ll need to be scrolled all the way to the top of the page in order for it to work.) Once you see a circle with an arrow appear, you can let go, sit back, and say: “Ahh. Isn’t that refreshing?”
21. Slide your way through Chrome’s commands
Excessive tapping is for amateurs. Instead of tapping Chrome’s menu icon, lifting your finger, and then tapping the item you want (pshaw!), slide downward on the button to move right into the menu without ever lifting your precious paw. Just keep swiping down until you reach your desired option, then let go — and Chrome will select it for you.
22. Pick up where you left off
One of Chrome’s most powerful features is something you might not even know exists: The browser always keeps all of your tabs synced and available across devices — which means you can open up Chrome on your Android device and get to the same tabs you left open on your laptop or desktop computer.
All you’ve gotta do to take advantage of it is open up Chrome’s main menu and select “Recent tabs.” There, you’ll find a full list of tabs currently or recently open in Chrome on any devices where you’re signed in. Just tap the tab you want, or press and hold on a device’s name to find an option to open all of its listed tabs at once.
23. Find that site you surfed to earlier
Maybe it’s not a recently open tab you need but one you had open a while ago — say, a page you were viewing from your laptop last night, before you shut it down and put on your favorite pink footie pajamas.
Well, no problemo: Tiptoe your way back to Chrome’s main menu, and this time, select the line labeled “History.”
Here’s the secret about that section: It shows every page you’ve had opened in Chrome while signed in on any device — including desktop and laptop computers along with any other phones or tablets — all in a single searchable list. You can browse through the pages chronologically or look for specific keywords using the box at the top of the screen.
This might also be a good time to remind yourself about the existence of Chrome’s Incognito mode for the type of web surfing you don’t want kept on record. And don’t forget, too: You can always clear your full browsing history from Chrome on any device, should the need ever arise. (Don’t worry: I won’t ask for details.)
24. Make a site especially easy to access
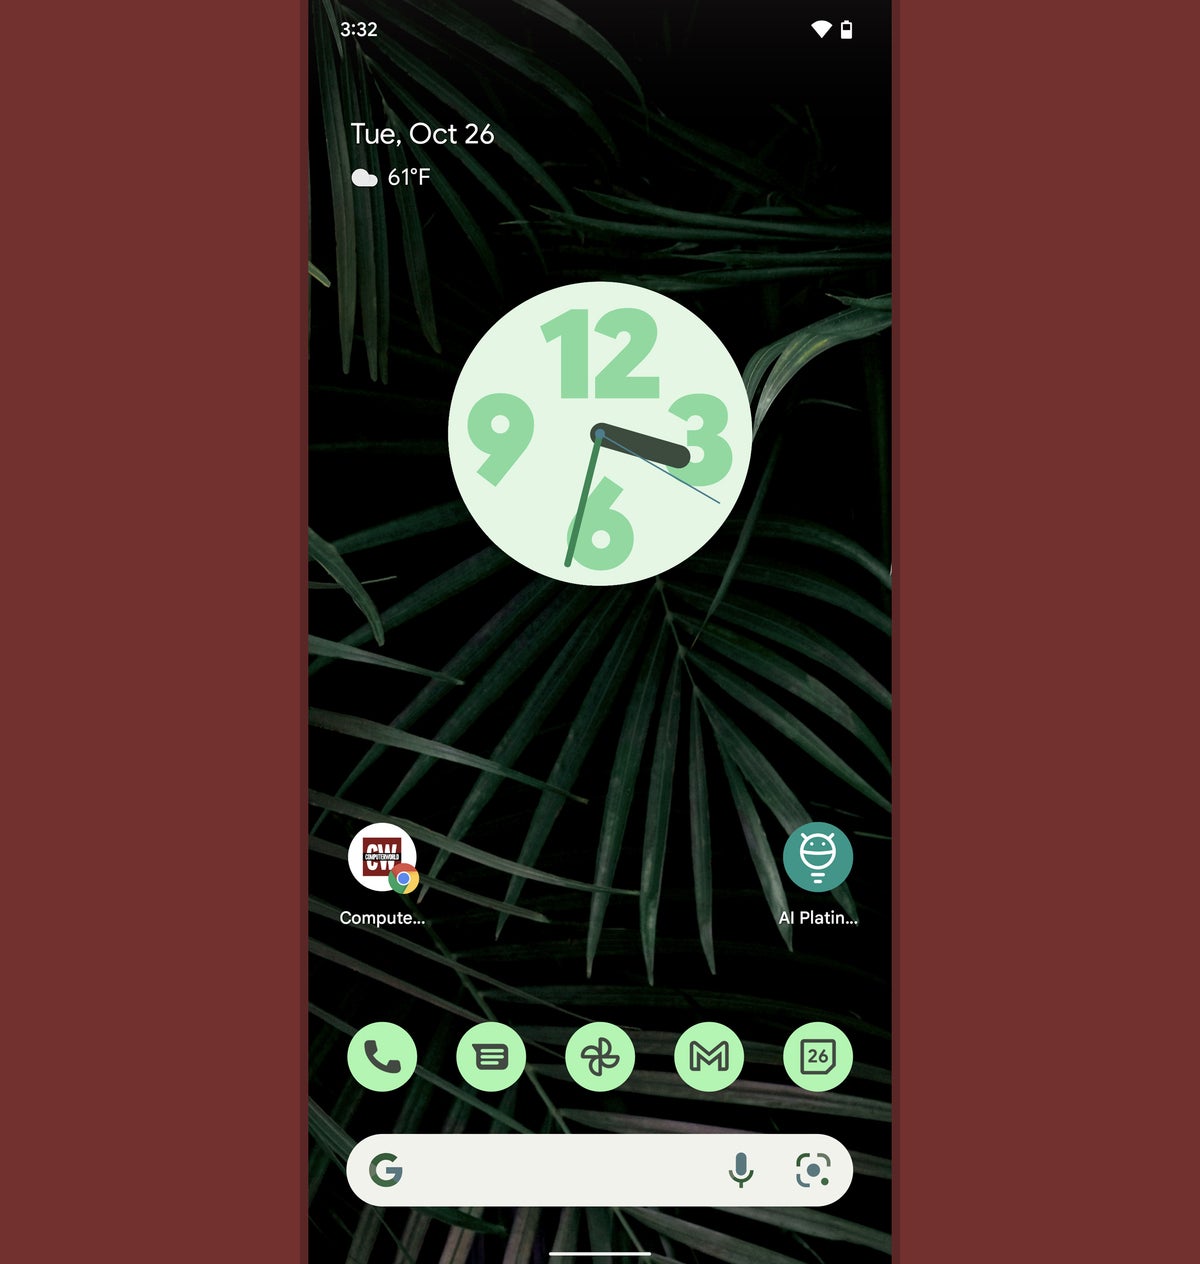
For any site you visit routinely, make your life a little easier by placing a one-tap shortcut directly to it on your device’s home screen. Just look in Chrome’s menu for the “Add to home screen” option. That’ll put the current site’s icon right where you’ll always see it for fast future access.
With some sites, you might see an “Install app” option instead. That indicates the site is available as a progressive web app, and installing it will give you an even more robust app-like experience — sometimes with the benefit of built-in offline access.
 JR Raphael/IDG
A direct shortcut to a site, at the bottom left (above the dock area), and a site turned into a progressive web app, at the right of that same line.
25. Speed up your browsing and use less data
These tips all revolve around the notion of saving time — so how about one that quite literally makes web pages load faster while also helping you use less data?
Chrome’s Lite Mode is a powerful yet out-of-sight system for doing exactly that: When activated, the feature routes pages through Google’s servers — in a split second — before they reach your device. The pages are then compressed and sent to you in a sized-down form, though you probably won’t notice any difference from a visual perspective.
You can try it out by opening the Lite Mode section of Chrome’s settings. Once the feature’s been running for a while, visiting that same section will show you a detailed breakdown of exactly how much data you’ve saved over time.
26. Swim into a wilder channel
You may know that Chrome offers different release channels for its desktop browser — but did you know you can also opt to be more adventurous with Chrome on your Android device?
If you like trying out new features before they’re released, grab Google’s Chrome Beta app. It gets new elements and interface changes before they’re ready for prime time (which, fair warning, means they might occasionally be a bit unpolished).
If you want to go a step further, try out the Chrome Dev app. It’s described as the “bleeding edge” version of Chrome, with experimental elements that are guaranteed to be “rough around the edges.” (Careful with those fingers!)
And if you’re really feeling bold, give the Chrome Canary app a whirl. It’s the most unstable and frequently updated channel of Chrome, with features so fresh they’re bound to be partially uncooked on occasion.
The best part? All of the Chrome Android channels exist as separate standalone apps. That means you can install any or all of them and run them right alongside the regular Chrome app, with no major commitment and no real risk involved.
And that, my friends, is what we call livin’ on the edge — in the most gentle and hazard-free way imaginable.
For even more time-saving magic, come check out my free Android Shortcut Supercourse to uncover advanced options for zooming around your device, typing out text faster than ever, and all sorts of other buried treasures.
This article was originally published in June 2018 and updated in December 2021.
Copyright © 2021 IDG Communications, Inc.

