It’s no coincidence that many programs using artificial intelligence techniques are open source and thus completely free. This is because the early approaches originated in academia, where free licences for software are common practice in order to promote collaboration and further development.
Here, however, it is not about frameworks and libraries for forms of AI, but about tangible and useful applications of artificial intelligence for your own computer. The term AI encompasses various methods such as neural networks, machine learning, deep learning, or natural language processing. In the following compilation, all these approaches are represented.
Further reading: How to make AI art
The models matter
The various approaches to pattern recognition, machine-processed decision trees, and automation of tasks are built on training data and models that are already ready. The availability of this data is one of the reasons why useful AI techniques are available in freely available software today at all.
Models generally take years to develop, and there are often terabytes of raw data to evaluate. But with the increasing computing power of common PC hardware, the development of AI models and the analysis of training data has accelerated in recent years, making it possible for smaller research teams.
The following compilation is about the practical benefits, i.e. the implementation of methods primarily in free software for Windows, which show well how far the technology has now progressed without high installation costs.
This is also thanks to open source developments — because with Pytorch, a deep learning framework from Facebook and Microsoft has been available since 2016, which has made a name for itself primarily in research and in free software projects with its APIs for Python and C++. Tesla’s Autopilot, among others, is also based on it.
The second big popular and free framework is Tensorflow, which comes from Google and delivers a tight binding to the Google Cloud, but also many libraries for personal use.
It is these two frameworks whose artificial intelligence mostly flows into the programs presented here via the connection of algorithms and data models, or was crucial in their development.
Final 2x – Enlarge image sizes
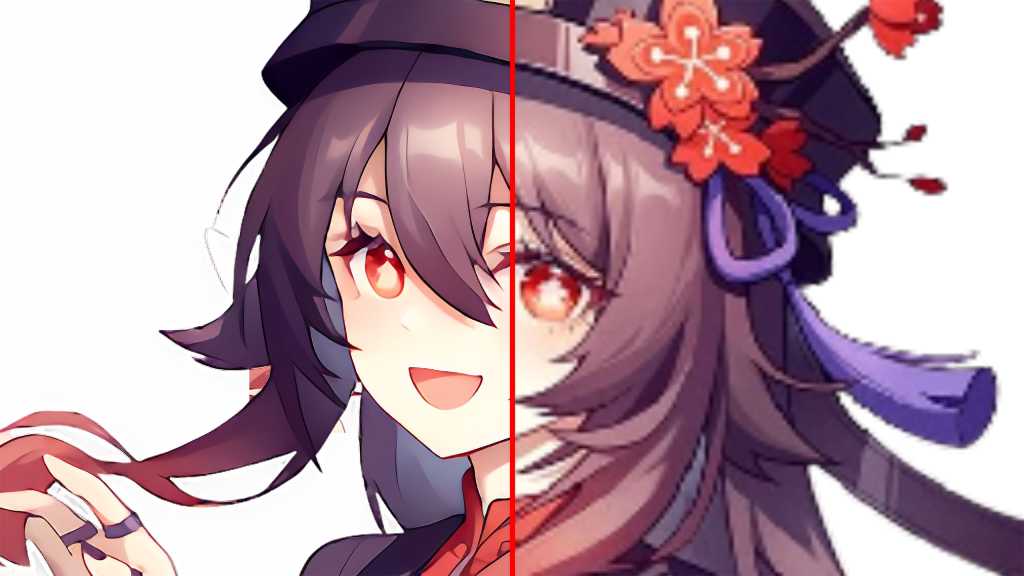
Well enlarged: Final 2x runs with any CPU and GPU. This pixelated graphic (left) has been enlarged to four times its original size (right) by the algorithm Waifu 2x.
IDG
Scaling bitmap graphics by merely enlarging their pixels always leads to a severe loss of quality. With Final 2x, enlarging bitmaps does not have to be lossy. The program Final 2x succeeds in upscaling graphics and smoothing them down to the last detail with the help of neural networks and the models supplied.
With the algorithms Real Cugan, Real Esrgan, Waifu 2x and SRMD, Final 2x provides four ways to scale images for the best results. The program can also significantly improve pixelated photos in JPG format with noise and strong artefacts.
Installation: Final 2x is also at the beginning of our useful tools collection because it is very easy to install under Windows and then immediately invites you to experiment successfully. There are also no special hardware requirements, because the neural networks and algorithms used in Final 2x run on Nvidia, AMD, and Intel chips. An integrated GPU is also enough.
As with all AI and neural network tools, however, the same applies here: A lot of RAM helps. For Windows, the developer provides the convenient installer Final2x-windows-x64- setup.exe (260 MB) on his Github page, which completes the setup with just a few clicks.
Hereʼs how it works: After starting, Final 2x presents an input field that accepts those image files in JPG or PNG format that it is to upscale by dragging and dropping. A click on the cogwheel symbol at the bottom left opens a page with settings. Under Device, the CPU/GPU for the calculation can be selected, if several are available.
The Model determines the image quality. The algorithm Real-ESRGAN is very well suited for photographs, while Waifu 2x is specialized for drawings. The scaling factor is determined by the Custom Scale field. It is also always advisable to activate the option TTA in order to obtain well-denoised results.
In the main window, Start begins the calculation, which can take several minutes for complex images.
Meshroom – 3D scanner for smartphones
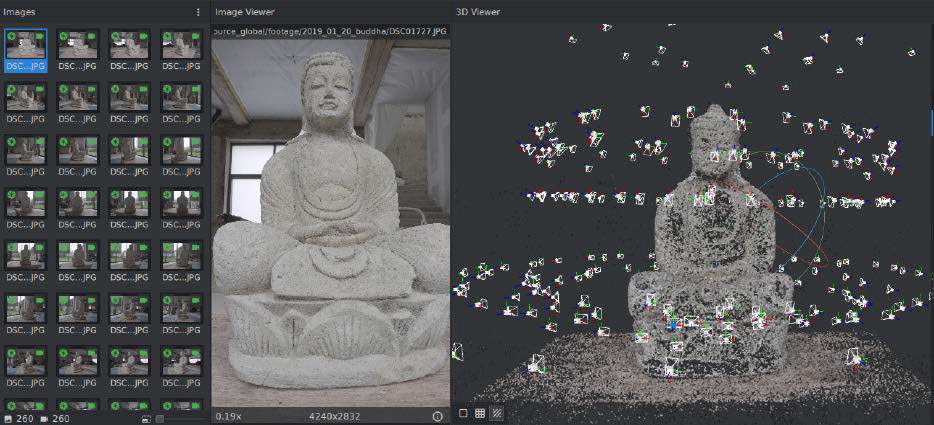
Welcome to the three-dimensional world: Meshroom creates a 3D grid from photographs of real objects for further processing in CAD programs and 3D models such as Blender.
IDG
A 3D scanner scans real objects with lasers and creates a file from the data for further use in CAD and animation programs. What sounds very complex is actually possible on a small scale with conventional smartphones or digital cameras and the free software Meshroom. It is based on the photogrammetric libraries of the developer Alicevision, is available under an open source license, and for Windows (64 bit). From the analysis of image series, it calculates the shape of a photographed object and creates a grid file.
Installation: Because of the Cuda interface required for calculations, Meshroom requires an Nvidia graphics card with support for at least Cuda 2.0. The table here shows which cards this applies to. The Cuda drivers from Nvidia for Microsoft Windows have a download size of 3GB.
Once the Nvidia hardware is set up, you can install Meshroom (1.3GB). With AMD graphics cards and Intel chips, Meshroom only works in the less precise sketch mode. Those with patience for calculations can test an alternative version of Meshroom without Cuda.
This is how itʼs done: When photographing the object to be scanned, it is important that it is as detached as possible in an empty room. Dozens of photos are needed from each side at different angles with a high depth of field and without blurring. It is important not to use an image size of more than 10 megapixels. The files are then dragged into the left-hand Images area in Meshroom to start the calculation, which takes a few hours even on Nvidia cards.
For further optimization of the mesh, 3D software such as the free program Blender is then recommended.
Kdenlive – Object tracking via AI
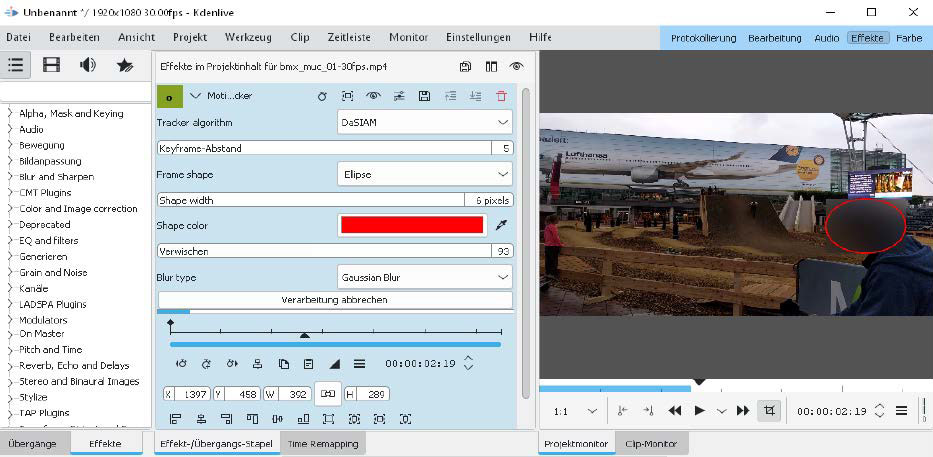
Tracking an object: The motion tracker “DaSIAM” in the newer versions of the video editor works with KITechniques and can, for example, make faces unrecognizable by blurring.
IDG
This free video editor has been able to come up with AI aids for two years now. Motion tracking, i.e. automatic object tracking in video clips, can provide recognized motifs with a mask and then apply targeted effects to them. This is useful, for example, to pixelate certain objects in a video clip.
Installation: Kdenlive is available as open source for Windows in 64 bit as a setup file (100MB) and is thus quickly installed. In addition, the model data for the motion tracking algorithm are now added. These are three files “dasiamrpn_ kernel_cls1.onnx“, “dasiamrpn_kernel_r1.onnx“, and “dasiamrpn_model.onnx” from the Kdenlive developers. All three files must be placed in the installation directory of Kdenlive. To do this, enter the address %AppData%/kdenlive in the address bar of Windows Explorer and create a new subfolder called opencvmodels. The three downloaded model files are then placed there.
This is how itʼs done: In Kdenlive, the motion tracker is available as an effect. To use it, place an imported clip from the list at the top left in the timeline below, switch to the Effects tab in the middle menu bar and select Alpha, Mask and Keying — Motion Tracker there. Dragging the effect onto the desired clip opens the settings for the effect and displays a red square in the preview window. In the settings, the type DaSIAM should be selected as Tracker algorithm. In the timeline, go to the first frame, place the red selection frame around the object and then click on Analysis to calculate the keyframes around the object. Pixelation, for example for faces, can also be selected immediately.
Spleeter – Splicing music into tracks
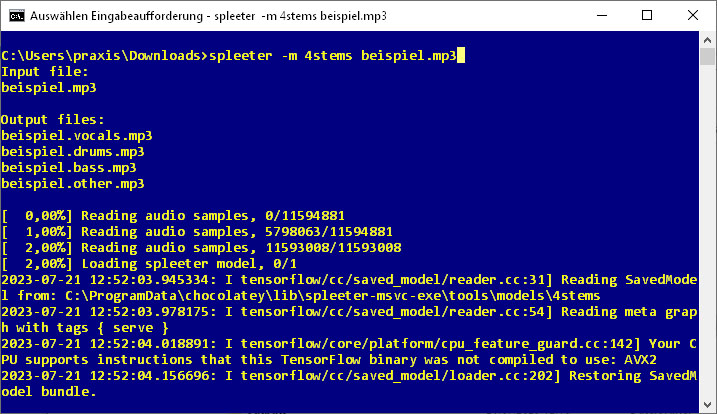
Skilfully deconstructed: Spleeter is a command-line tool that uses AI and extensive models to break down music files in MP3 format into individual tracks with isolated instruments.
IDG
This is how ready-mixed pieces of music become individual tracks again: The AI tool Spleeter already received a lot of attention two years ago after its first presentation. It can divide music in MP3 format into two, four, or five individual tracks using pre-trained models.
Spleeter recognizes categories such as vocals, bass, drums and rhythm section. The command-line tool uses the AI library Tensorflow to analyze the data stream in music pieces and the encoder Ffmpeg to separate the isolated tracks into individual MP3 files.
The AI tool and the training of the models come from the French streaming service Deezer, which was allowed to use the enormous, licensed catalogue of pop music as analysis material for pattern recognition. This training data is also available for free private use, but must be installed separately.
Installation: Thanks to its popularity, there is a Windows version of Spleeter that saves the tedious installation of the individual Python program components. This compact port for Windows is available via the package manager Chocolately, which first waits to be set up. To do this, first go via the Start menu to the Windows Power Shell, which opens with a right click and the option Run as administrator. In this command line, the command:
Set-ExecutionPolicy AllSignedenables the execution rights with the entry “j”. Then the command:
Set-ExecutionPolicy Bypass -Scope Process -Force; [System.Net.ServicePointManager]::SecurityProtocol = [System.Net.ServicePointManager]::SecurityProtocol -bor 3072; iex ((New-Object System.Net.WebClient).DownloadString('https://chocolatey.org/install.ps1'))installs the Windows package manager Chocolately.
Then the package manager can install Spleeter in the Powershell with this input:
choco install spleeter-msvc-exeNow the installation of the training models is necessary. For this purpose, the batch file “download_models.bat” is used in the newly created directory “C:ProgramDatachocolateylibspleeter-msvc-exetoolsmodels”, which is also called in the Powershell and downloads about 1.2GB of data — no small matter. Finally, Spleeter requires the installation of the Visual C++ Redistributable from Microsoft.
This is how itʼs done: Once all the steps have been completed, you can continue in the Powershell or in the command prompt. The call:
spleeter.exe datei.mp3splits an existing MP3 file in the current directory into vocals and instruments, which it places in the folder as individual MP3 files. This is the simplest application example, which also takes only a few seconds of computing time on a current PC with average performance. In typical pop music, however, Spleeter recognizes additional tracks for isolation, such as drums and bass.
spleeter.exe -m 4stems datei.mp3In this example, Spleeter uses its pattern recognition to search for four individual tracks in a piece of music, namely vocals, bass, drums, and rhythm/accompaniment. The calculation takes a little longer until these tracks are written to the working directory as individual MP3 files.
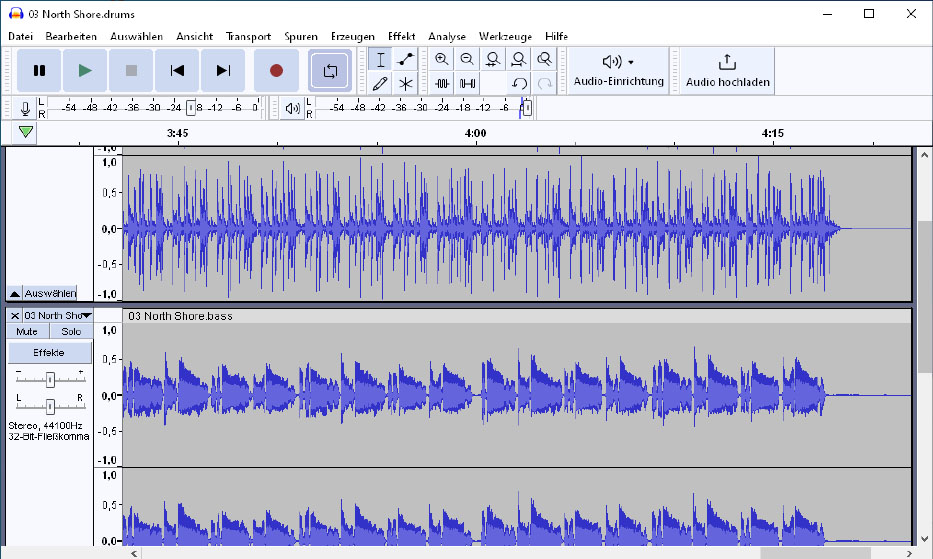
A look at the tracks created in the audio editor Audacity: Spleeter works very precisely in separating instruments and vocals, but cuts off high frequencies in the process.
IDG
If in the piece of music at hand the accompaniment has a strikingly unique feature, Spleeter can also use this command to split it into five tracks, which works best with vocals, bass, drums, piano, and rhythm section:
spleeter.exe -m 5stems datei.mp3Skilfully deconstructed: Spleeter is a command-line tool that uses AI and extensive modelling to split music files in MP3 format into individual tracks with isolated instruments.
Microsoft Edge – Enhance images
With its own data centers behind it, Microsoft is working on equipping everyday programs with as many AI techniques as possible. What is useful in the long run remains to be seen. Undoubtedly, the new capabilities of the Edge web browser to automatically upscale images and even videos deliver very nice results on high-resolution screens.
Installation: Although Microsoft Edge is already pre-installed on Windows, the browser’s AI techniques for image enhancement are only available in the developer version of Edge. The setup file of this public preview version of the Microsoft browser is available.
This is how itʼs done: the browser does not do the image enhancement locally on its own computer, but sends the images to Microsoft servers, where they are extrapolated and sent back to the browser. This means that Microsoft knows and will evaluate which images users retrieve on the web. This AI option is therefore not activated by default. Instead, the function is still waiting to be activated on the options page under the address edge://settings/privacy/enhanceImages via the displayed switch.
There, this function can also be activated specifically for individual websites. Only in the alpha versions of Microsoft Edge called Canary is the AI function available, also to improve blurred videos up to 720p resolution with the help of its own GPU. This AI method in Edge requires newer graphics chips from AMD or Nvidia together with suitable proprietary drivers and does not send the data to Microsoft servers.
Vosk – Speech recognition via AI
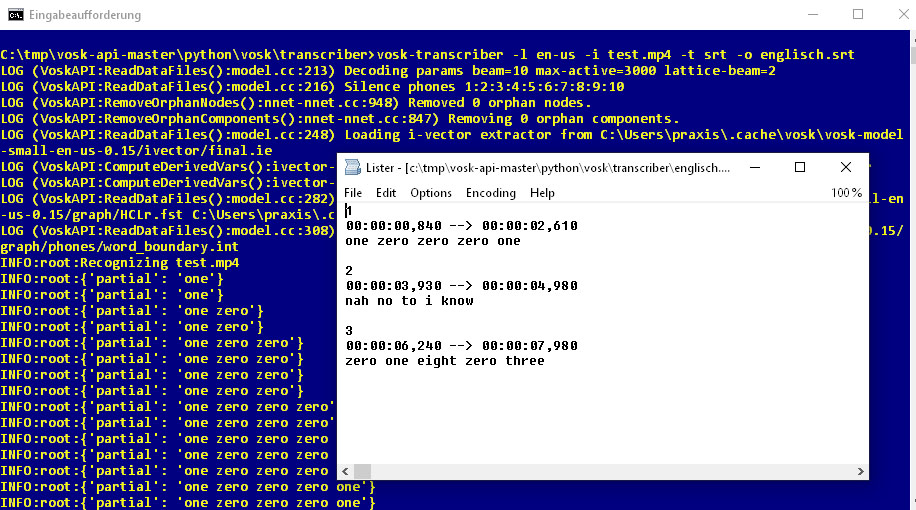
From spoken language to subtitles: In this example, we let Vosk recognize the audio track of an English-language YouTube video in MP4 format. The result is this SRT file.
IDG
From the spoken, recorded word to a clean transcription is not a long way off today. The AI framework Vosk, which is based on the speech recognition engine Kaldi, is an open source project of Johns Hopkins University.
Installation: Vosk requires Python 3.11 on Windows. During installation, the checkbox Add Python to PATH must be activated. In the command prompt, the two commands:
pip install ffmpeg
pip install vosk
install the prerequisites for Vosk. Next, the encoder/decoder Ffmpeg is required in the form of the file “ffmpeg-git-essentials.7z“. The archive content is placed in the newly created directory “C:Program Filesffmpeg” so that the file “ffmpeg.exe” is located there in the subfolder “bin”. Now the path “C:Program Filesffmpeg|bin” must be added to the Windows environment variable “Path”. This can be done via Windows icon > Settings > System > Advanced system settings > Environment variables > Path > Edit > New.
This is how itʼs done: Then go to the Github website http://github.com/alphacep/vosk-api to download some sample scripts under Code – Download ZIP, which are unpacked into any directory. There, in the subfolder “pythonvosktranscriber”, you will find the example script “transcriber.py”. With the call:
vosk-transcriber -l en-us -i test.mp4 -t srt -o englisch.srtit creates the subtitle file “english.srt” from the video file “test.mp4” by speech recognition with timestamps. The script automatically downloads a suitable language model. The finished file can then be further processed in other translation programs to subtitles in another language.
Digikam – Face recognition for photos
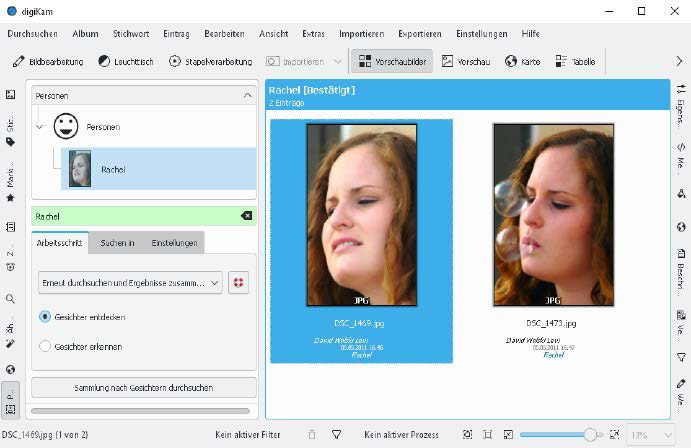
Digikam recognizes faces: From the images of the scanned photo collection, the photo management creates a local person database and then allows tagging and searching for persons.
IDG
Digikam, a program for database-supported organization of large photo collections that has been in constant development for more than 15 years, was originally developed for Linux and is regularly ported to Windows. This is because Digikam’s capabilities are considerable: In addition to sorting and categorizing photographs by albums, tags, and keywords, there are advanced sorting options. Face recognition and the automatic grading of the image quality of shots are two newer features of the photo management that are based on AI.
Installation: Digikam is easily installed in Windows with 64 bit via a setup program (114MB). The installation program asks for some details with sensible default settings for the setup. After the first call of Digikam, the program then independently suggests downloading the required AI model data for the included face recognition, which amounts to around another 420 megabytes.
This is how itʼs done: Digikam has been experimenting with face recognition in images based on neural networks since version 2.0. But only since version 7.2 has this AI technology been able to prove itself in practice in Digikam. After opening a photo, the image display shows the symbol of a person with a plus symbol. This is used to manually mark a face with a selection rectangle and give it a name.
This is repeated for a few more pictures with the person, whereby the name is then selected from the displayed list. The whole photo collection can then be searched for the same person via the menu item Search > People.
Hugin – Panoramas from photo series
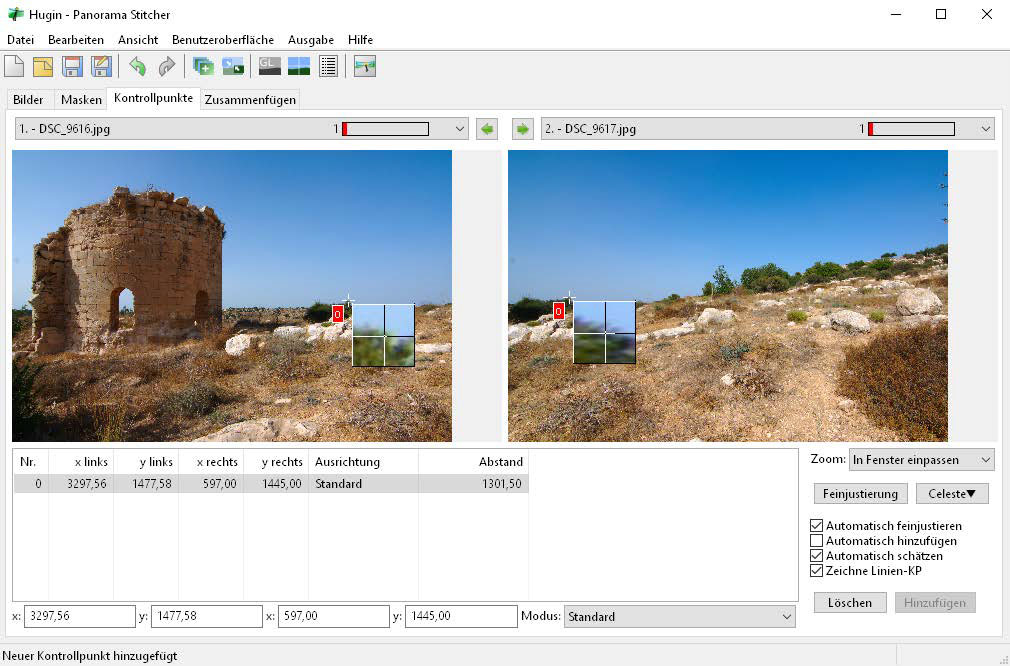
Combines photo series automatically by pattern recognition: Hugin calculates a scenery or a panorama image from series of neighboring pictures. The control points shown here help in this process.
IDG
And another tool for photos that saves many hours of tedious image processing and allows for completely new sceneries in landscape photography. The program Hugin creates panorama photos from overlapping series of single images. Panoramas are particularly appealing in landscape photography to capture dramatic moods. This has also been possible with smartphone apps for several years. Hugin, however, allows precise control over the result and can also combine individual images in vertical rows.
Installation: Hugin is a Windows program and simply needs to be unpacked from its ZIP archive into any folder. The executable file can be found as hugin.exe in the subfolder “bin”.
This is how itʼs done: Hugin is a tool for advanced users and you should not be at a loss for lengthy experiments until all the functions of the program have been explored. It is recommended to start with small panoramas consisting of two individual images added to the Images tab. For good results, you should always manually add the focal length from the metadata of the individual shots. Added control points between overlapping images via the tab of the same name improve the result considerably.
Subsync – Synchronize subtitles
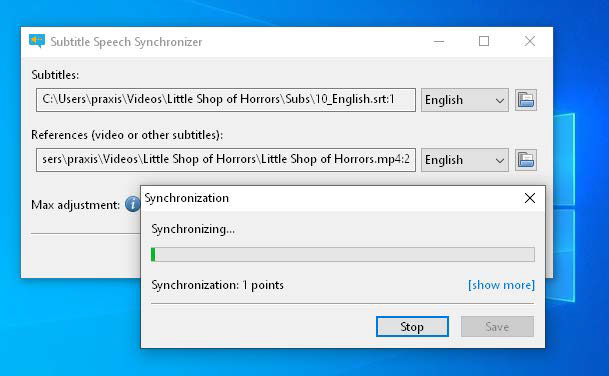
Calculate time codes in subtitle files to match the video: Subsync uses speech recognition via the integrated Python module Pocketsphinx and analyzes the specified video file.
IDG
Cinophiles prefer films and series in the original version without dubbed dialogue. A subtitle track is nevertheless helpful — and necessary anyway for unknown languages.
Websites like opensubtitles.org provide subtitles for series and films in formats that media players like VLC can handle. The difficulty here is often finding a suitable subtitle file that runs in sync with the video file at hand. If the subtitles do not match the spoken word in the film, the enjoyment of the film will also fall by the wayside.
The free tool Subsync can fix this: With speech recognition and artificial intelligence, it synchronizes the subtitle file with a video file.
Installation: Here, too, no long excursions into the command line are necessary. On the project website at https://github.com/sc0ty/subsync/releases, there is an installer and a portable version for all Windows versions with 64 bit for download (free, 42MB).
Calling up this EXE file unpacks the program into a subfolder in which the program file can then be found.
This is how itʼs done: In the program interface, the path to the subtitle file in SRT format is entered in the upper field Subtitles, and the language of this file must be entered next to it. Below this, the field References expects the video file, and the selection next to it, the language.
After clicking Start, Subsync will then download the appropriate dictionary files for the selected languages, which amounts to several dozen megabytes.
After that, synchronization begins based on matches found, and Subsync rewrites the timestamps of the SRT file to do this
This article was translated from German to English and originally appeared on pcwelt.de.

