It’s as easy to make a custom Zoom background that’s silly to mess around with your friends and coworkers, as it is to make a serious Zoom background for business meetings. We’ll show you how.
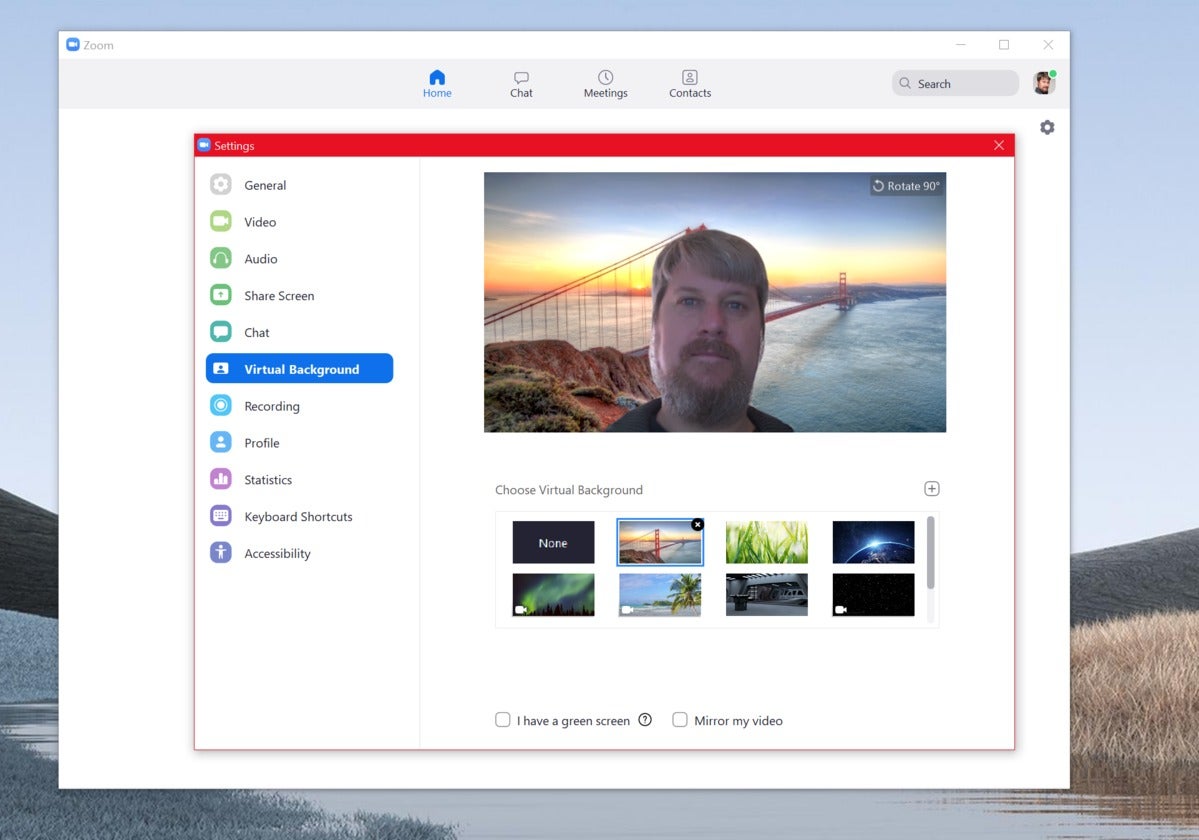
Normally, a webcam shows just what it sees: you, your kitchen table, maybe an unkempt desk in the background. But Zoom, like Microsoft Teams, can use custom backgrounds that completely obscure all that background clutter. After enabling that background, the only thing the camera will see is your face, like this:
 Mark Hachman / IDG
Zoom’s AI-generated backgrounds are pretty seamless with a good PC.
We’ll show you how to enable that option and take advantage of Zoom’s built-in backgrounds. But there’s more: Zoom offers background video, too—a looping video that can replace the Zoom’s static background image. We’ll also show you how to select your own background video to replace Zoom’s basic options.
How to turn on custom backgrounds within Zoom
Historically, Zoom required a “green screen” to enable custom backgrounds—yes, the literal green backdrop traditionally used by movies to enable a canvas for computer-generated special effects. That changed last year, when the Zoom desktop app became smart enough to distinguish you from the objects behind you. Custom backgrounds don’t seem to work on the Zoom web client, though.
Zoom has a rather complex list of minimum requirements that you’ll need to enable custom backgrounds, but here’s what they boil down to:
- An up-to-date Zoom app running on Windows 7, 8, or 10
- A PC with a supported microprocessor: a quad-core 6th-gen Core i5 (except a U-series chip); a quad-core 4th-gen Core i7; or any 3GHz processor with 8 cores or more.
If you don’t know what you have, don’t worry. This is all simple enough that it will either work, or it won’t. Virtual backgrounds are also available for iOS (with an iPhone 8, 8+, or X, or an iPad Pro and the 5th and 6th-gen iPads) but support for Android isn’t listed.
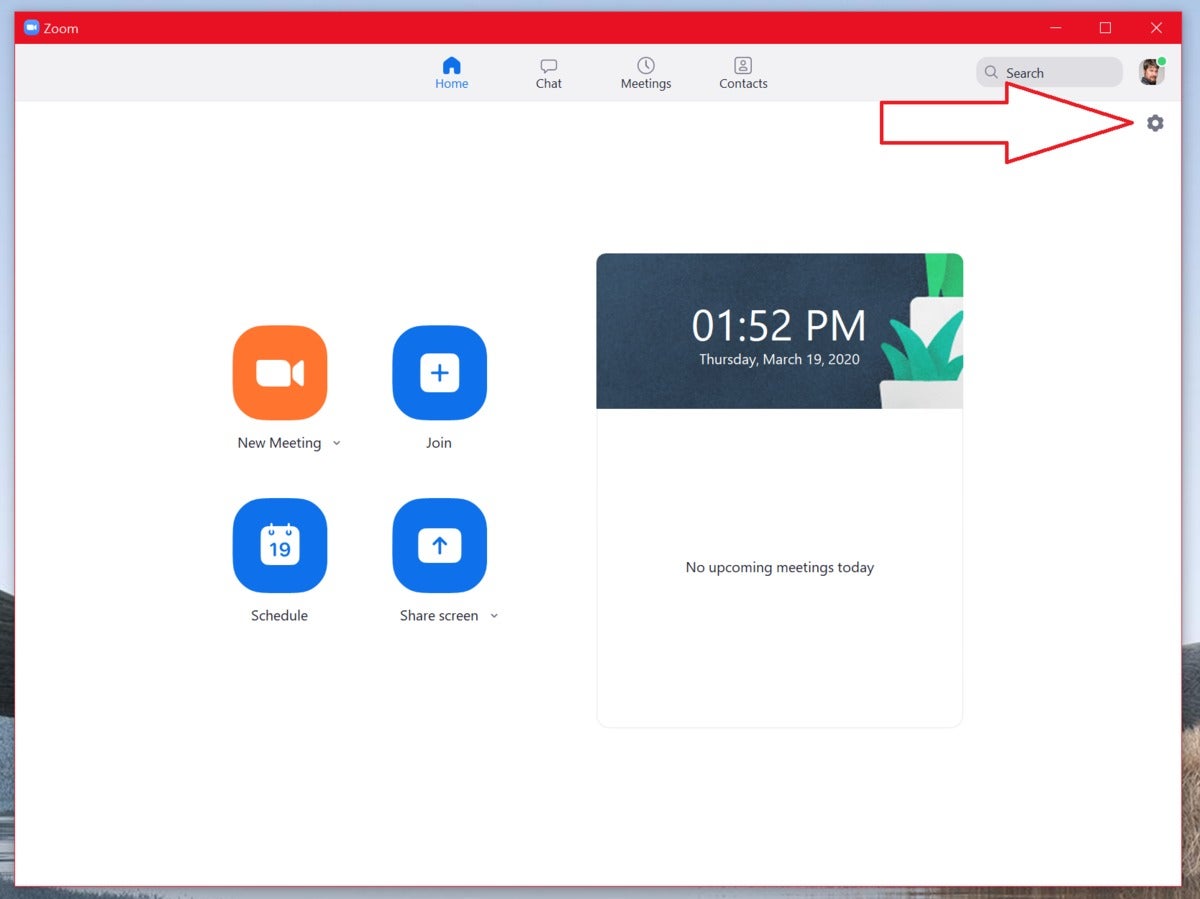
When the Zoom main screen opens up, you’ll see the Zoom main page. The first thing to do is to click the Zoom Settings gear in the upper right-hand corner. This opens up a wealth of options, but the relevant one for us is the Virtual Background option.
 Mark Hachman / IDG
The gear icon hides Zoom’s Settings menu.
Zoom makes this step extremely easy. By default, Zoom turns on your webcam, and you should see what others in your chat will see: you, and your background. But if you click one of the images below your video window, you should see what’s behind you replaced with either a static image (the Golden Gate Bridge is a favorite) or else a slowly looping video background, like the northern lights or Zoom’s beach scene. (As you might expect, video files have a small camcorder icon in the corner.)
As you can see from the screenshots, there is an option to enable a green screen, if you have one. But on my test machine—the recent Surface Pro 7—I certainly didn’t need one.
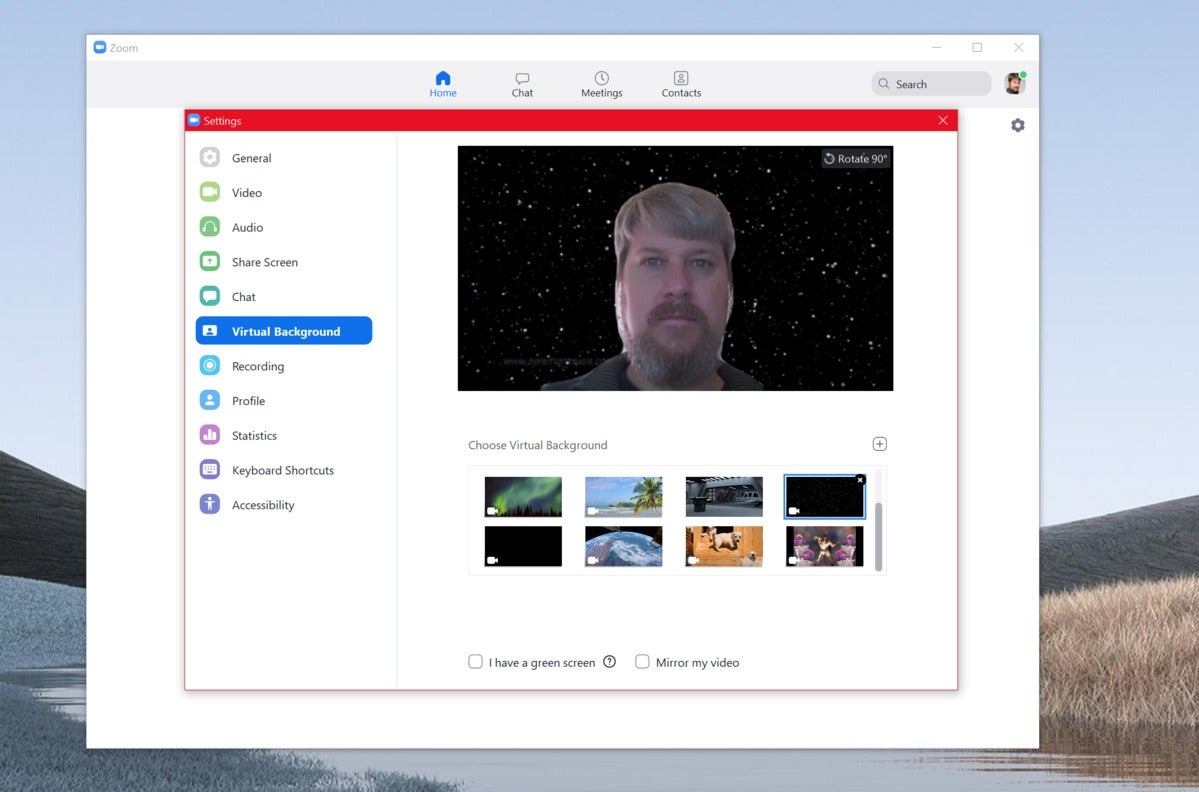
The background feature isn’t perfect: The background sometimes obscured my collar, and Zoom isn’t always friendly to those who talk with their hands. Zoom also recommends that you don’t wear clothes that are the same color as your background.
 Mark Hachman / IDG
Zoom will arrange your available backgrounds beneath the video window. The Zoom client does a pretty good job of distinguishing my navy-blue sweatshirt from the dark background, too.
How well Zoom distinguishes you and applies the background correctly appears to be both a function of your webcam and your computer’s processor: The better they are, the more accurate the result. But you should be able to tell in a flash if the results are acceptable.
How to create a custom background in Zoom
Creating a custom background in Zoom is child’s play, honestly. If you click the small “+” icon, you’ll have the option of selecting either a static background or video file. Picture file formats supported include BMP, JPG, and PNG. With video, you’ll have the options of MP4 or MOV. You’ll need either a background image with an aspect ratio of 16:9 and minimum resolution of 1280×720 pixels, or a video file with a minimum of 480×360 pixels (360p) and a maximum resolution of 1920×1080 pixels (1080p).
Selecting a static image is especially easy. Recent Zoom calls among PCWorld staffers have included background images of Bridge A from Star Trek‘s U.S.S. Enterprise, and the Oval Office. Zoom recommends that you pick a copyright-free image, but the company doesn’t seem to enforce it.
Once you select an image or video file, Zoom adds it to the visual index of virtual backgrounds within the Virtual Background setting menu.
How to create a video loop as a custom Zoom background
But what if you don’t want to use Zoom’s preselected clips, and want to create one of your own? If you’d like to use an existing video file, of course, we’ve just shown you how to do that. The other way is to take an existing file and trim it down, keeping just the content that you want to show off.
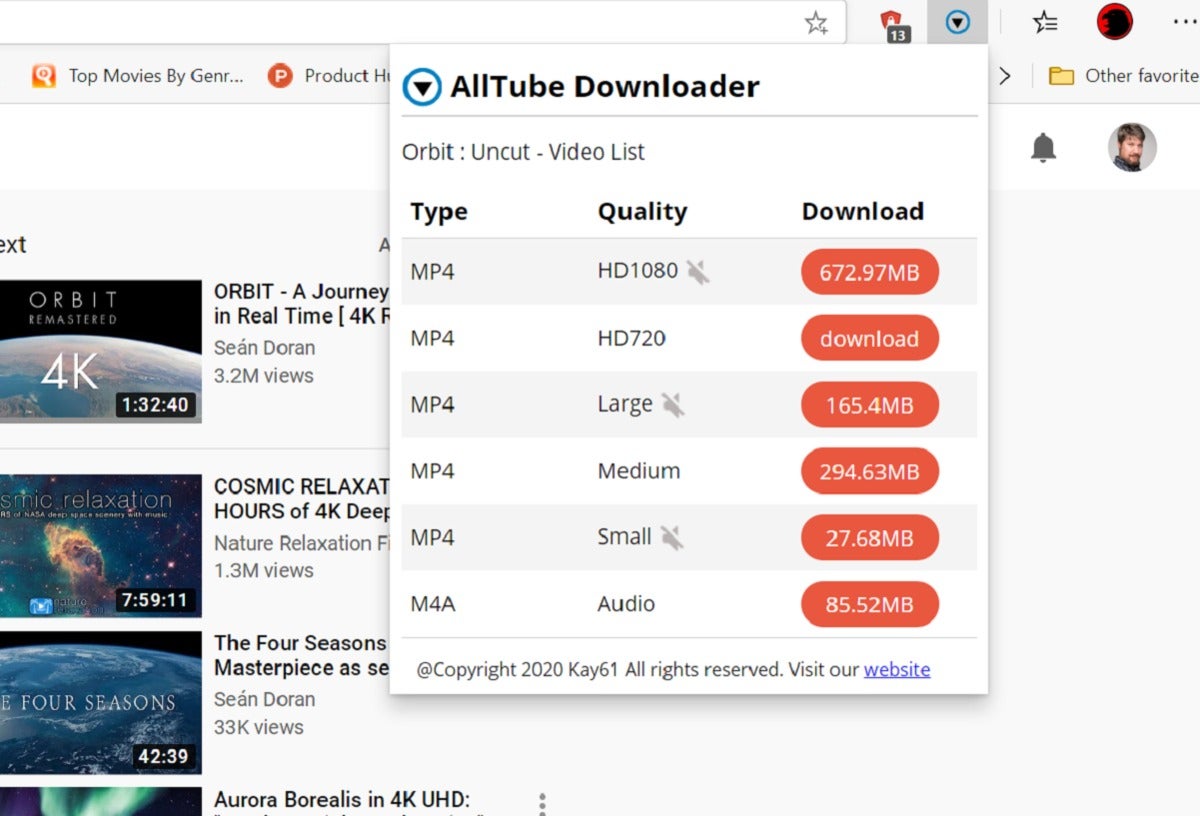
How you get the file is up to you; we have an in-depth guide on how to download videos from YouTube, but you may already have video files on hand that will suffice. In any case, you’ll want to whittle it down to a short, looping clip. Fortunately, there’s a simple video editor already within Windows that makes this very easy.
 Mark Hachman / IDG
If you do end up downloading a YouTube video, you can use the low-quality option for background use and file size. You’ll also be trimming it down so you’re just sampling a small clip.
Video Editor is a relatively new addition to Windows, though it’s closely tied to the existing Photos app—in fact, you’ll see “Photos” in the header, rather than “Video Editor.” Video Editor is basically a slimmed-down version of Windows Story Remix, a 2017 app that quietly faded alongside Windows’ mixed-reality effort.
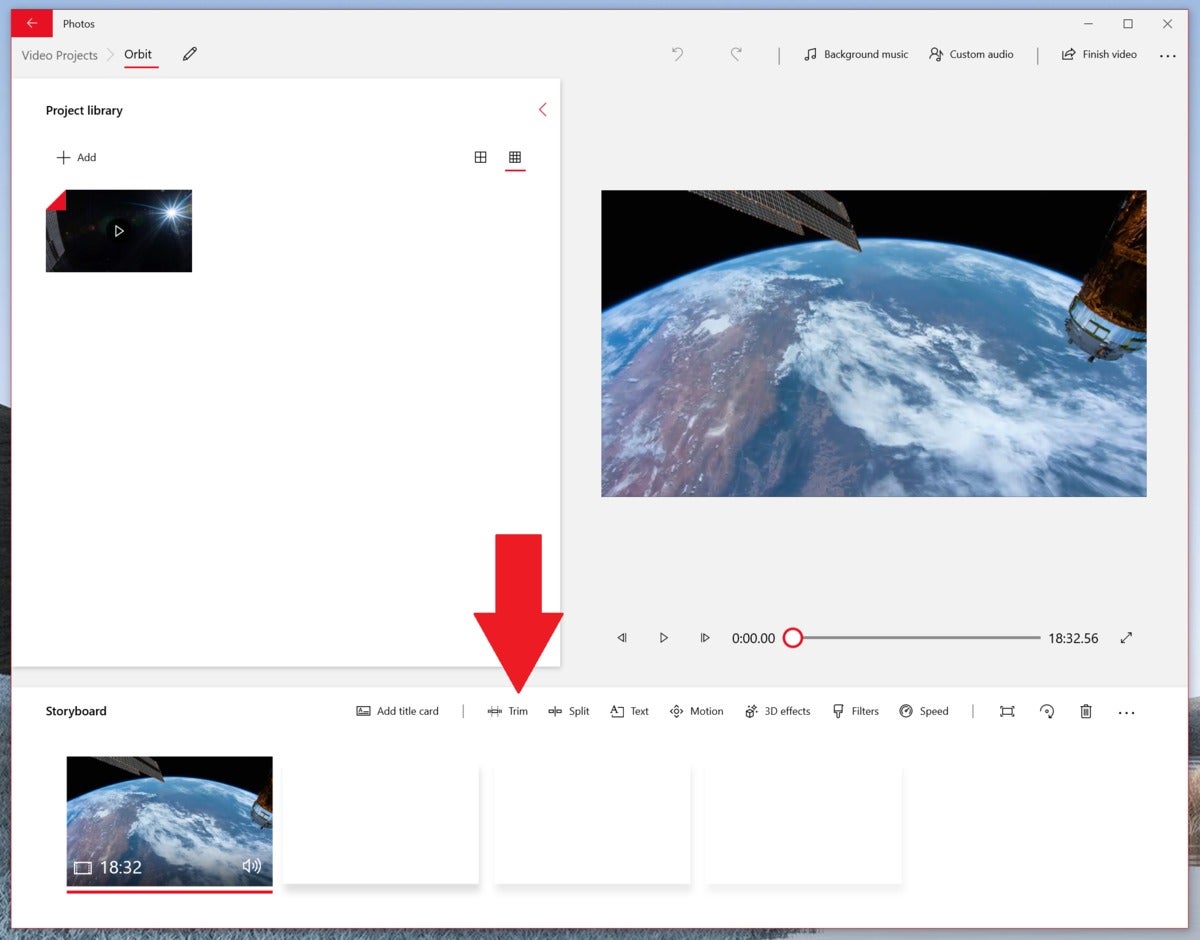
When you open Video Editor, you’ll want to select the button that asks you to open a new video project. That will take you to this screen, titled Video Projects:
 Mark Hachman / IDG
Once you’ve loaded your video file, trim it using this button.
In the Project Library box, click the Add button and select your video file. The clip will then appear in the Project Library. You’ll then need to drag it down to the Storyboard, below, and into the first box. It’s here that you can add all sorts of effects to your video, but for our purposes we only need one: the Trim feature.
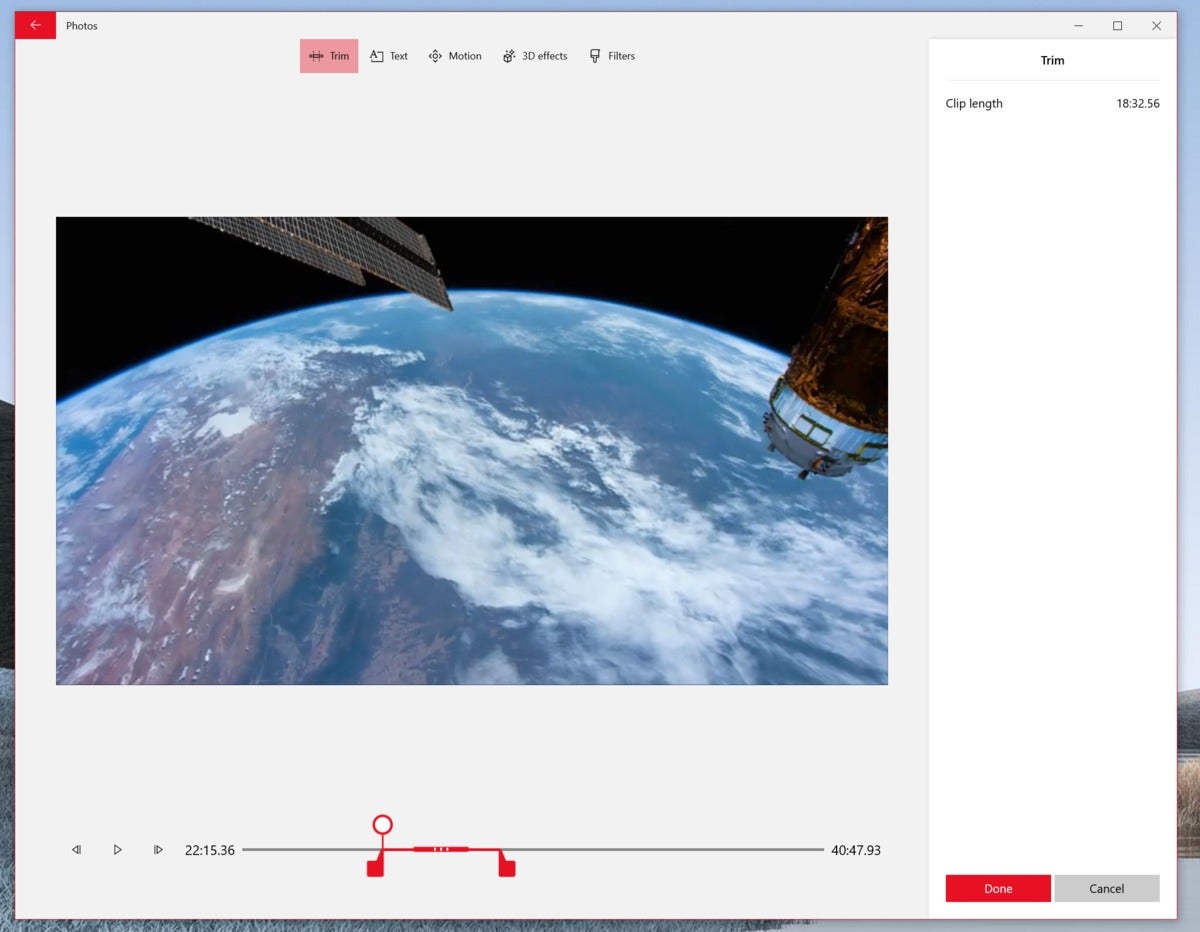
The Trim screen allows you to use the two trim markers to the left and right to define where your clip begins and ends. You can use the Seek pin to help you set the defined limits on either end. (Remember, Zoom will loop the end of the trimmed video back to the beginning.) Click Done when you’re finished.
 Mark Hachman / IDG
Adjust the length of your video clip using the Trim feature. Remember that you’re going to be looping the video, so select just a small portion of it.
Video Editor will then take you back to the Video Projects box, where you’ll want to click Finish video to save and export your video. You may as well save it in 1080p quality, though you’re certainly free to choose another format. Remember, this is a background video, so the quality doesn’t have to be top-notch.
From here, you’re essentially done. Open the Zoom app again, even if you’re not connected to a meeting, and double-check that your video looks the way you want. Remember that a video background may annoy your coworkers—even if that’s the intent!—so you may want a calmer, more businesslike background as a secondary option.
Or you may want to take it a step further: PCWorld’s Gordon Mah Ung figured out how to make a custom Zoom Background looping video of yourself, so you can look like you’re in the meeting even if you aren’t. Use wisely!
How to use an animated GIF as a Zoom background
 Reddit
 Reddit/r/GIFs is a great place to find GIFs.
You’d think if Zoom supported video backgrounds that it would also support animated GIFs natively, but for some reason it doesn’t. No worries: Our own Gordon Mah Ung has figured out a workaround. You can use the power of existing online tools to convert your favorite animated GIF to a file format Zoom will support. Occasionally Zoom may resist your efforts, but worst case, you just try again.
In any event, it’s fun just to explore, create, and develop a background to suit your mood or the situation. You can use a custom background to define your sense of personal style—after all, chances are your coworkers won’t really see what you’re wearing, anyway!
Note: We used the following YouTube videos to illustrate this story: Guardians: Inferno, Cute Puppies Playing in Backyard (4K), Orbit (Uncut), and Starfield – 2 Hours Deep Space Travel.
This story, “How to make a funny Zoom background to entertain your friends and coworkers” was originally published by

