When Windows 8 made its public debut in October 2012, one of the new features it introduced to users was called File History. Still available in both Windows 10 and 11, it can help you make sure you never lose an important file.
Simply put, File History is a snapshot mechanism for all files that users store in the primary folders or directories associated with their user accounts. Formerly known as Libraries, these folders include Documents, Music, Pictures, Videos, and Desktop. Also included are offline files associated with the user’s OneDrive account.
How File History works
You’ll see some references refer to File History as a backup and restore tool. To some extent, this description is justified. But it’s important to understand that File History backs up only certain files. It cannot, for example, back up entire drives. Nor can File History restore an entire Windows installation. Such coverage comes from whole-system backup and restore tools; see “How to make a Windows 10 or 11 image backup” for details.
What File History does is take a snapshot of all files in the aforementioned folders and local OneDrive contents at regular intervals. It provides an interface to review and retrieve previous versions of files from such snapshots. In the sections that follow I explain how to:
- Turn File History on, and where to target its snapshots
- Exclude folders from the snapshot process
- Retrieve files from a snapshot
To conclude, I’ll also explain differences in coverage and capability between Windows 10 and Windows 11 versions of File History. The good news here is that File History looks and behaves mostly the same across both versions. (For consistency, all screen captures here come from Windows 11, but their Windows 10 counterparts are nearly identical, saving rounded corners on display windows.) The bad news is that Windows 10 offers more snapshot coverage than Windows 11, as I’ll explain at the end of this piece.
Read on for the important details involved in turning File History on, so you can put it to work.
Turning File History on and targeting snapshots
By default, File History is turned off in both Windows 10 and 11. It can be accessed via either Control Panel or the Settings app. To set up and configure File History, use Control Panel; the Settings entry point is best reserved for snapshot file retrieval and is covered later on.
Microsoft recommends, and I concur, that File History works best when it targets an external storage device (such as a USB drive, preferably an SSD or hard disk of 100GB or greater capacity). It’s best to attach the target drive before turning on File History for the first time.
Note that if BitLocker is enabled for the primary Windows drive (usually C:), you must also enable BitLocker To Go on external drives upon which you wish to capture encrypted library folders using File History. It’s best to do this before enabling File History as well. In Windows 10, right-click the target drive in File Explorer and click Turn on BitLocker; in Windows 11, right-click the target drive in File Explorer and choose More options > Turn on BitLocker. If BitLocker is not turned on for the C: drive, you can skip this step.
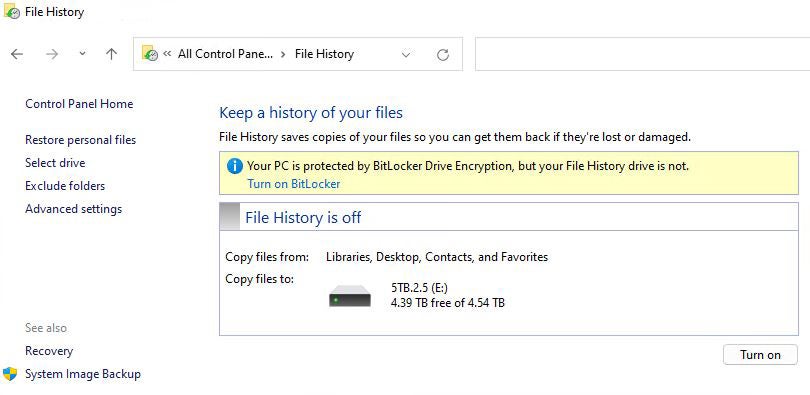
To configure File History via Control Panel, either type control panel into Windows search and click the item named File History, or simply type file history in Windows search. A Control Panel item named “Keep a history of your files” appears, as shown in Figure 1.
 IDG
IDGFigure 1: To turn File History on, click the Turn on button at the lower right.
In Figure 1, File History shows a warning for external drives that lack BitLocker protection, because my C: drive uses BitLocker. Turning on BitLocker for the target drive removes the warning in File History.
The target drive is shown in the lower pane. In this case, it’s drive E:, a nominal 5TB external hard disk.
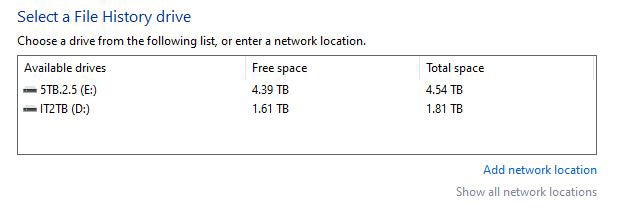
Once you click the Turn on button at the lower right of the window, File History will be turned on for the target drive. If you want to choose a different target drive, you can first click the Select drive option shown at the middle left in Figure 1, and see a list of eligible target drives, as shown in Figure 2.
 IDG
IDGFigure 2: You can select any option that appears in the select list as a File History target drive.
Select the drive you want to use for File History backups. Because the default selection is the largest available drive, I’ll stick with that for my File History target.
Note: If you wish network drives to appear in the listing shown in Figure 2, you must first map them to the local system. You can click Add network location at the lower right to add such a drive. If network drive mappings are already defined, click Show all network locations.
Back on the main File History screen, click Turn on to enable File History for the target drive.
Taming File History’s storage appetite
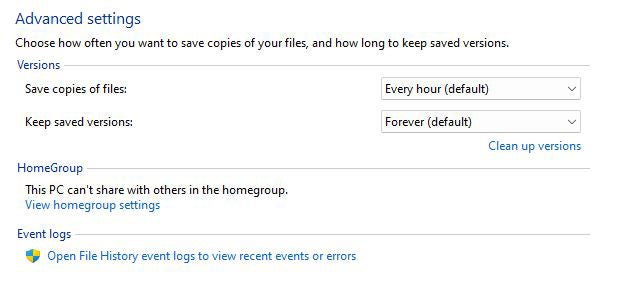
Using File History’s advanced settings can have profound impacts on the storage that File History consumes. In the main File History window (see Figure 1), click Advanced settings in the left column. Figure 3 shows File History’s backup defaults, which I routinely change when I use this built-in Windows facility.
 IDG
IDGFigure 3: By default, File History makes a snapshot every hour and keeps them forever.
As it turns out, the total contents of the folders that fall within the “snapshot coverage” of File History on my PCs run between 13.5GB and 40GB in size (lots of pictures and music are involved). If a snapshot is made every hour, that means 24 snapshots a day. In turn, that means 324GB on the low end, and 960GB (nearly a terabyte) on the high end. Every day!
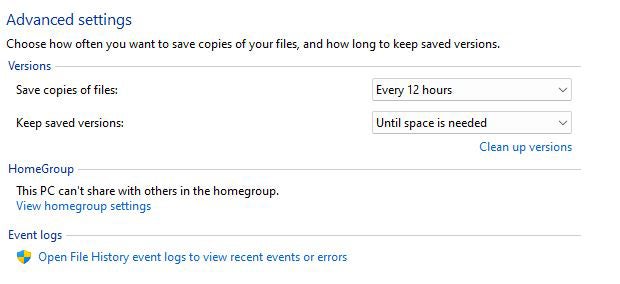
My first moves when changing File History defaults appear in Figure 4.
 IDG
IDGFigure 4: To prevent rapid disk consumption, snapshot at 12-hour intervals and limit space consumption.
By limiting snapshot frequency and instructing File History not to permit complete drive consumption, you can avoid potential future issues.
That’s it for File History setup. In the next section, I’ll describe how to exclude folders from your snapshot contents.
Excluding folders from Snapshots
In addition to ratcheting down the frequency and duration of snapshots, you can limit snapshot size by excluding certain folders from snapshot coverage. Click Exclude folders in the left column of the main File History window (see Figure 1) to drive this process.
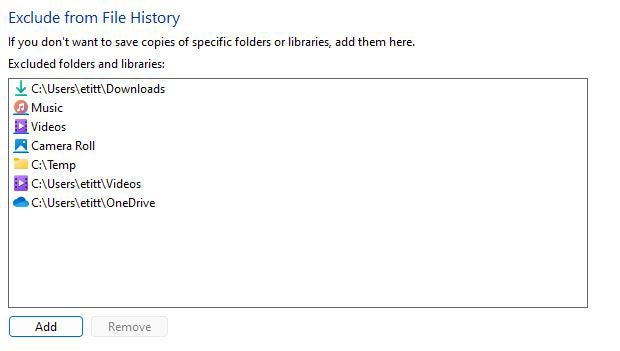
A File Explorer interface pops up where you can select certain folders that you don’t want included in daily snapshots. Figure 5 shows the folders I typically exclude. I discuss these choices — and their implications — in a bulleted list after Figure 5.
 IDG
IDGFigure 5: I exclude folders that I back up in other ways or don’t care about snapshotting. You should do likewise.
Here’s an explanation of the folders I exclude, listed by name in order of appearance top-down:
- Downloads: these can (and often should be) downloaded from the source again anyway, to get most current versions.
- Music: I have more than 200GB of music total, so I don’t want it snapshotted. I keep a backup copy of all my music on a detached drive, and can restore anything damaged or lost as needed.
- Videos: same as Music (appears twice in the screenshot because of File Explorer structures).
- Camera Roll: same as Music.
- Temp: I choose not to snapshot temporary files (and I’ve never needed to restore any, either).
- OneDrive: I have remote copies of everything in OneDrive in the cloud, so there’s no need to save OneDrive files that are available to me offline.
My trimming method cuts the size of each snapshot from over 300GB to a much more manageable 1.5GB on my target disk. That leaves a LOT more room on the target drive for saving snapshots, too.
Restoring items from a snapshot
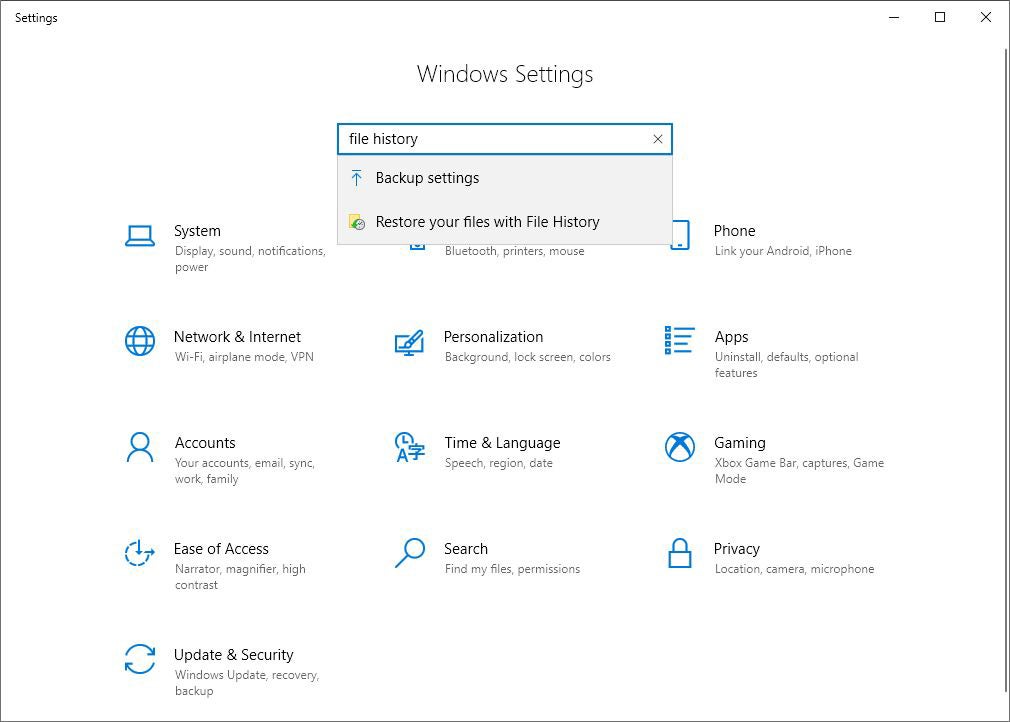
If at some point a file (in one of the folders that File History backs up) becomes damaged or goes missing, you can restore it via the Settings app. Click Start > Settings, then type file history into the Settings search box. From the options that appear, select Restore your files with File History.
 IDG
IDGFigure 6: Clicking “Restore your files with File History” is the first step to recovering your files. (Click image to enlarge it.)
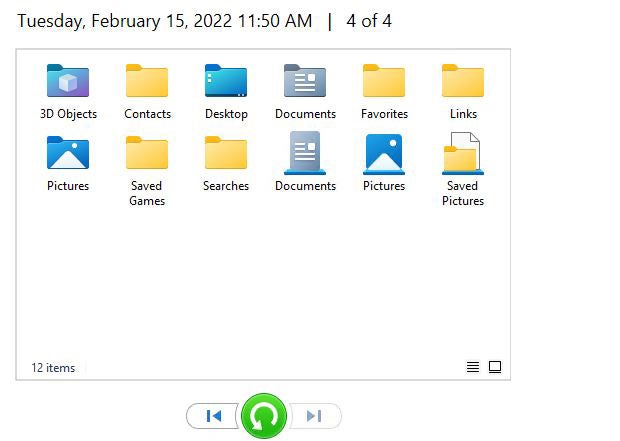
Figure 7 shows a File History snapshot from which folders or files can be retrieved, which appears when you select the Restore your files… item shown in the preceding figure. This list of elements represents a trimmed-down snapshot after I excluded the folders mentioned above.
 IDG
IDGFigure 7: Select an item and click the green “back-circle” arrow to restore it.
The folder level retrieval tool at the bottom of Figure 7 (the green “back-circle” arrow) is the key to restoring files and folders. If you select any item in the main pane, then mouse over the arrow, it reads “Restore to original location.” Click the green arrow, and the selected item will be restored to your PC in the state it was when the snapshot was made, replacing the version of the item that’s currently on your PC. (To highlight multiple items for restoration, hold the Ctrl key down while you click the items you want.)
That’s the basic restore technique for File History. There are two more wrinkles:
- You can navigate into any of the icons shown above by double-clicking. Then you can select a sub-item and restore on a file or sub-folder basis.
- By default, the restore operation starts with the most recent snapshot. You can navigate snapshots to get to a specific date/time by clicking the left or right arrows: left takes you back in time, right moves you forward. Figure 7 shows “4 of 4” at top right because I chose the oldest snapshot available to make the screenshot.
It’s really quite simple, as long as you’re careful about what you select and replace.
The File History difference between Windows 10 and 11
There is one asterisk to File History’s “covered folders” limitation: In Windows 10, you can copy other folders into the covered folders that File History backs up, and they’ll be backed up too. (TenForums.com has an excellent tutorial detailing how to do so.)
In Windows 11, even if you copy other folders into those containers, they won’t be backed up. This turns a general-purpose backup tool (for user folders, anyway) in Windows 10 into something more focused and specific in Windows 11.
File History: To use or not to use?
File History is there for those who wish to use it in Windows 10 or 11. It can cover the contents of your user files, and is particularly helpful for snapshotting the Documents folder.
Personally, I tend to store my work files on a pair of separate drives where I keep all “work in progress.” That image backup also includes my D: and F: drives (where I keep “work in progress” and key personal files). I also keep music, videos and pictures on separate drives (and folders). Thus, I prefer making a daily image backup to using File History on my production PC (still running Windows 10, BTW).
For those who use Windows’ default library files (Documents, Pictures, Video, Music, and so forth) to store their important stuff and work in progress, File History can be a useful and valuable source of backup snapshots. It’s up to you to decide whether or not it makes sense, as long as you make use of it along with a complete backup and restore software tool that can replace your Windows image as well as the files it uses. As they say on the internet, YMMV (Your Mileage May Vary), but more protection is always better than less!
Copyright © 2022 IDG Communications, Inc.

