As people use Windows 10 or 11 in their daily work, problems, issues, and outright errors will sometimes occur. Then, it may be necessary to engage in troubleshooting exercises to attempt to diagnose underlying causes.
Sometimes such identification can lead to attempted fixes. Sometimes such attempts even succeed. Other times, fixes may not be available, which may necessitate working around problems and/or reporting those problems to Microsoft.
All this said, a certain discipline to troubleshooting Windows is likely to help users and admins get through the process and get back to work with minimum disruption.
What troubleshooting is all about
Three basic activities, each involving careful observation and some documentation, drive most troubleshooting efforts. Briefly described, these consist of:
1. Observing and describing symptoms: On Windows devices, some symptoms are entirely overt. They will often include error messages that you can look up to directly identify causes.
Other symptoms may be more general, such as “system runs slowly,” “takes forever to boot,” “application takes forever to launch,” “long network latencies,” and so forth. These latter kinds of problems can be more vexing and time-consuming to fix, but may be amenable to specific troubleshooting tools (described in more detail in “Windows troubleshooters” later in this story).
2. Matching symptoms to potential causes: For observed symptoms, online research will usually help to correlate potential causes. For observed error messages, potential causes will often be identified explicitly. (Warning: such identifications don’t always pan out, but they often do.)
Keeping track of identifications can be important when matching symptoms to causes. That’s because many symptoms of Windows trouble may have multiple potential causes, only one (or some) of which will be actual causes.
3. Attempting fixes or workarounds based on potential causes: When a potential cause is identified, further research may lead to recommended or documented fixes. Keeping track of what’s been tried is important so that you don’t repeat the same (or similar) potential fixes — especially those that don’t do anything.
When troubleshooting leads to fix attempts (as it often will), it’s prudent to make an image backup before applying such fixes — and make sure you have tools at hand to restore that backup from alternate boot media. Why? Because the worst-case outcome from an attempted fix is a PC that won’t boot or run properly. By booting from recovery media and restoring the pre-fix image backup, you’ll get back to where you started with minimum muss and fuss. (See my story “Build the ultimate bootable Windows repair drive” for more details.)
In step 3, there will often be repeated trial-and-failure maneuvers before a fix or workaround is implemented, or you run out of options. Keep track of the time you invest in troubleshooting, so you will know when to consider short-circuiting the process. Though it’s a bit of a detour, that’s the next troubleshooting technique I must recommend.
Short-circuiting the troubleshooting process
There’s a kind of “universal panacea” to Windows problems you should keep in mind when you start troubleshooting. I explain this fix-all in my story “How to fix Windows 10 with an in-place upgrade install.” (The same technique works for Windows 11 just as well.)
Basically, it involves replacing all of the OS files for whatever version of Windows you’re currently running using setup.exe from a matching Windows ISO. This takes 15 to 30 minutes and fixes the vast majority of issues that require troubleshooting in the first place.
Thus, if I find myself 30 or more minutes into a troubleshooting exercise, I start thinking, “Maybe I should do an in-place upgrade.” By the time I’m 60 minutes in, if I’m still not making progress, “maybe” gets dropped, and that’s what I try next. In my personal experience in dealing with hundreds of Windows issues and problems over the past three decades, this technique works in 80% to 90% of all such cases.
But first, try the following troubleshooting tools to diagnose and fix the problem without overwriting the operating system files.
Working with Reliability Monitor
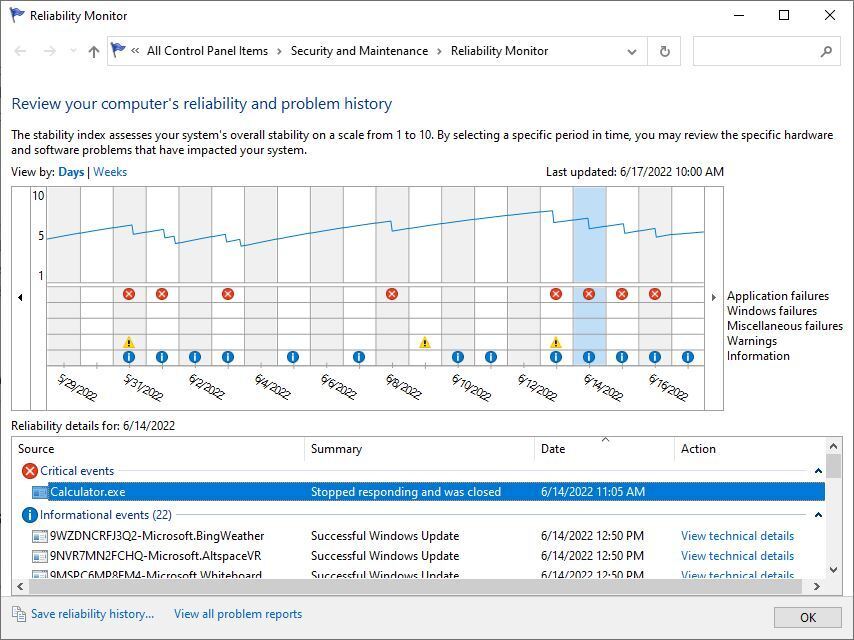
If you’re lucky, the Windows trouble you’re shooting is already known to Windows built-in monitoring facilities. This includes the Reliability Monitor, available through the Settings app (type reli into the Settings search bar, and an item named “View reliability history” comes up). It will often show you a message under the heading “Critical events,” as shown in Figure 1. Notice that Calculator.exe (the built-in Windows calculator app) experienced a glitch on June 14: “Stopped responding and was closed.”
 Ed Tittel/IDG
Fig. 1: Reliability Monitor can be an excellent source of info about errors and issues in Windows. (Click image to enlarge it.)
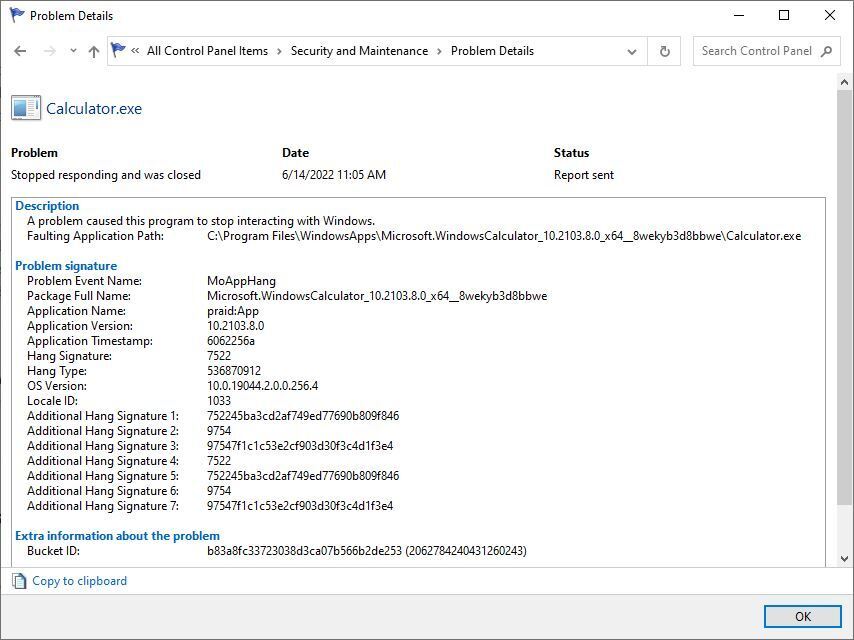
In Reliability Monitor, details for entries are available by double-clicking them. Figure 2 shows the details available for the calculator error highlighted in Figure 1.
 Ed Tittel/IDG
Fig. 2: Details for the calculator error show a “MoAppHang” problem event name. With proper decoding, this tells you it quit interacting with Windows and was closed. (Click image to enlarge it.)
Notice the key entry “Problem Event Name.” It takes the value “MoAppHang,” which means that a UWP application — in this case, the calculator — has stopped responding to the operating system, a condition known in troubleshooting speak as a “hang.” Simply put, the calculator stopped communicating with the OS, and was therefore closed. I blogged about this kind of error in November 2018 in more detail, if you’d like to know more.
Reliability Monitor can help you identify a great many Windows issues and problems. My story “Troubleshooting Windows 10 with Reliability Monitor” explains how best to work with this tool, which works identically and with equal capability in Windows 11. Windows admins might additionally wish to try Reliability Monitor’s more complex and capable cousin Event Viewer, also built into Windows.
Using the Windows Error Lookup Tool
Many of the kinds of things that Reliability Monitor and Event Viewer find also produce Windows error codes. Thankfully, Microsoft offers a free command line tool called the Microsoft Error Lookup Tool, a.k.a. “ERR,” that can help you understand more about what error codes seek to communicate. That makes this tool worth downloading and keeping around. As I write this story, the current version of the tool is named Err_6.4.5, with a creation date of May 2021. The latest version, however, is always available at from the Microsoft Download Center.
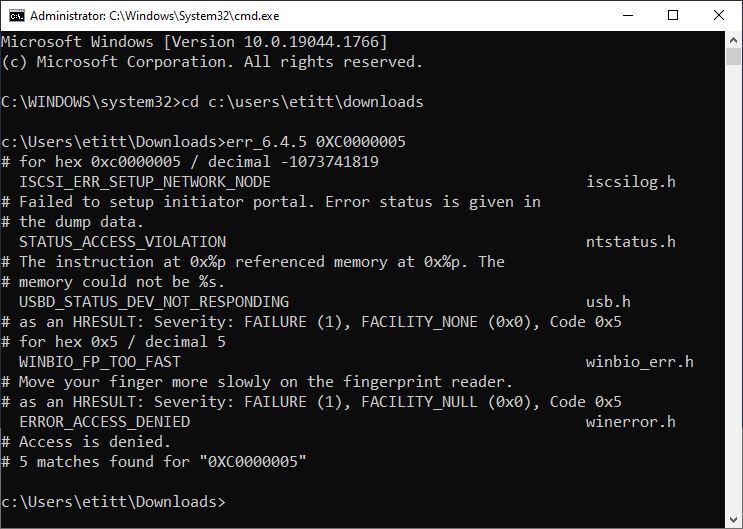
Indeed, when an error code is available for a problem, using the tool is the best way to search for fixes and/or workarounds to address that problem. For example, in Reliability Monitor I found an exception code value of 0XC0000005 for a recent BEX error associated with a Samsung Magician service. As shown in Figure 3, the Error Lookup Tool produces five matches for that code.
 Ed Tittel/IDG
Fig. 3: Error code lookup output for code 0XC0000005. Here, winerror.h is the most relevant. (Click image to enlarge it.)
Looking up the BEX problem event name online shows it’s associated with access violations. Also, the winerror.h include file, the last result shown in Figure 3, is the one most likely to produce errors when accessing a service. Thus, I can tell that the ERROR_ACCESS_DENIED interpretation is most likely for this particular error code and associated module (Samsung Magician, which handles my C: drive SSD on the target system). In fact, winerror.h is one of the sources that the tool uses to look up system error codes.
Searching on error codes (using Google, for example) is a decent strategy for investigating causes and fixes. Restricting that search to microsoft.com will sometimes help, but that will provide “official” strategies that might omit known, but less-than-perfect workarounds. I usually check the Microsoft path first, and if it provides no joy, move onto third-party sources and solutions. Sites such as Tom’s Hardware, MSPowerUser, Neowin, Windows Central and TheWindowsClub all have copious info on error codes and related fixes or workarounds.
Bring on the Windows troubleshooters
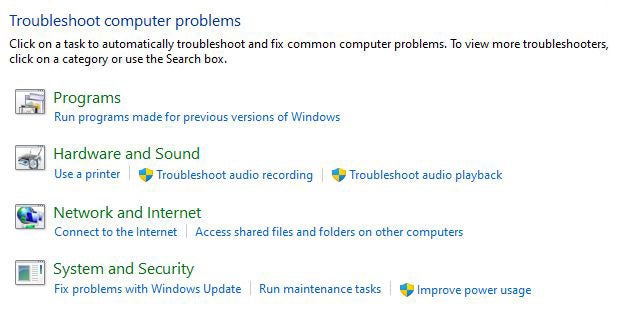
If you can’t pinpoint an error code for your current trouble, don’t despair. Your next move should be to turn to the Windows troubleshooters. Type trouble into the Windows search tool in either Windows 10 or Windows 11, and you should be able to launch the Control Panel item entitled “Troubleshoot computer problems” shown in Figure 4. You can use its categories — Programs, Hardware and Sound, Network and Internet, and System and Security, to drill down more deeply into a specific problem area.
 Ed Tittel/IDG
Fig. 4: Follow the categories to find an appropriate troubleshooting tool, and let Windows do the work!
Screenshot: windows-troubleshooting-fig04-windows-troubleshooters.jpg
Fig. 4: Follow the categories to find an appropriate troubleshooting tool, and let Windows do the work!
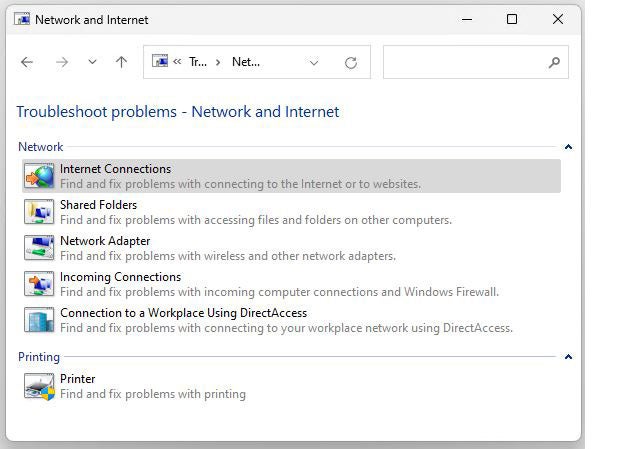
By way of illustration, Figure 5 shows the various troubleshooting tools available under the Network and Internet heading.
 Ed Tittel/IDG
Fig 5: Troubleshooting tools for network and internet issues. Pick one!
Because internet access problems are something any Windows user can relate to, let’s run the Internet Connections tool to see what it does.
It launches the tool, prompts the user to click Next, then offers two options: 1. Troubleshoot my connection to the Internet and 2. Help me connect to a specific web page. Upon picking 1, the tool runs diagnostics, which will report potential issues if any are detected.
When it can, a troubleshooter will also attempt to fix problems it diagnoses, and it also reports whether such repair attempts succeed or fail. This makes troubleshooters good, all-around “fix-it” tools for all kinds of common Windows problems or issues.
In general, this explains how the various troubleshooters work. It’s worth exploring the categories and the individual tools so you can use them should you ever need them.
If nothing else works, try this…
Despite all troubleshooting efforts, including the aforementioned in-place repair install, in some cases Windows trouble simply can’t be vanquished. Should that happen to a PC under your care, it may be time to reinstall Windows from scratch and start over. See my story “Windows 10 recovery, revisited: The new way to perform a clean install” for instructions, which works for Windows 11 as well.
Heaven forbid you should need that story, though it’s ready to talk you through that process if all else fails. Good luck!
Copyright © 2022 IDG Communications, Inc.

